
Our Starlink satellite dish would keep us connected while wilderness camping, but we needed a way to power it and all the rest of our electronics. An obvious solution would be a small, portable generator such as the Honda EU2200i. We used one on our first boat, that lacked a generator, and it worked well.
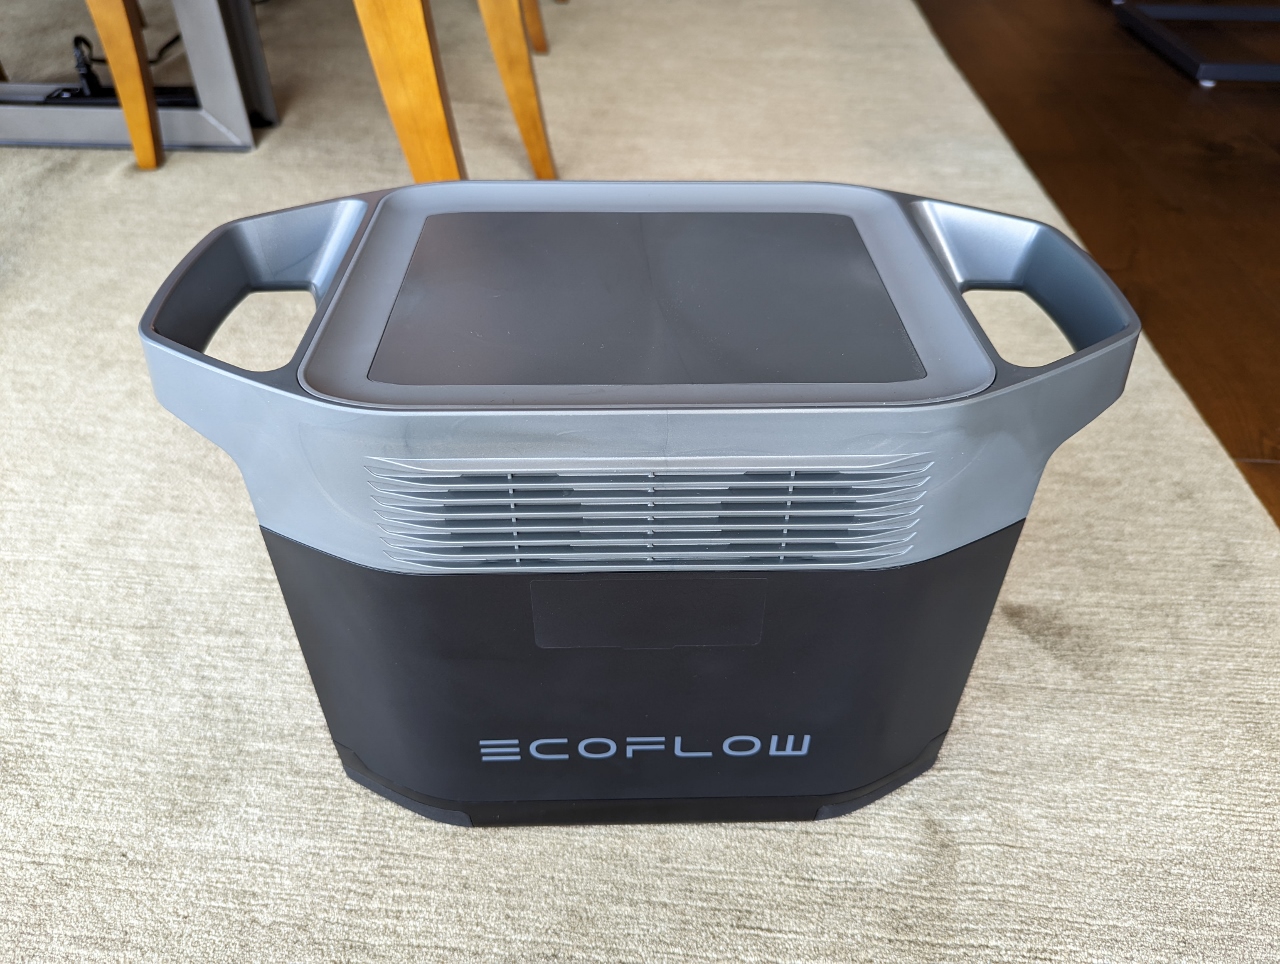
The Honda is quiet for a generator, but still is louder than we would like, is fairly bulky and heavy, and requires a separate gasoline source be carried. We looked instead to the lithium-based portable power solutions that have recently come to market. They have the advantage of being quiet, always on, and require no separate fuel source. We selected an EcoFlow DELTA Max 2000 because it has a super-fast charging mode, the ability to support high-load appliances, and an excellent App that supports remote control and monitoring.
|
|
| EcoFlow lithium-based portable power solution out of the box, left, and charging at home for the first time. | |
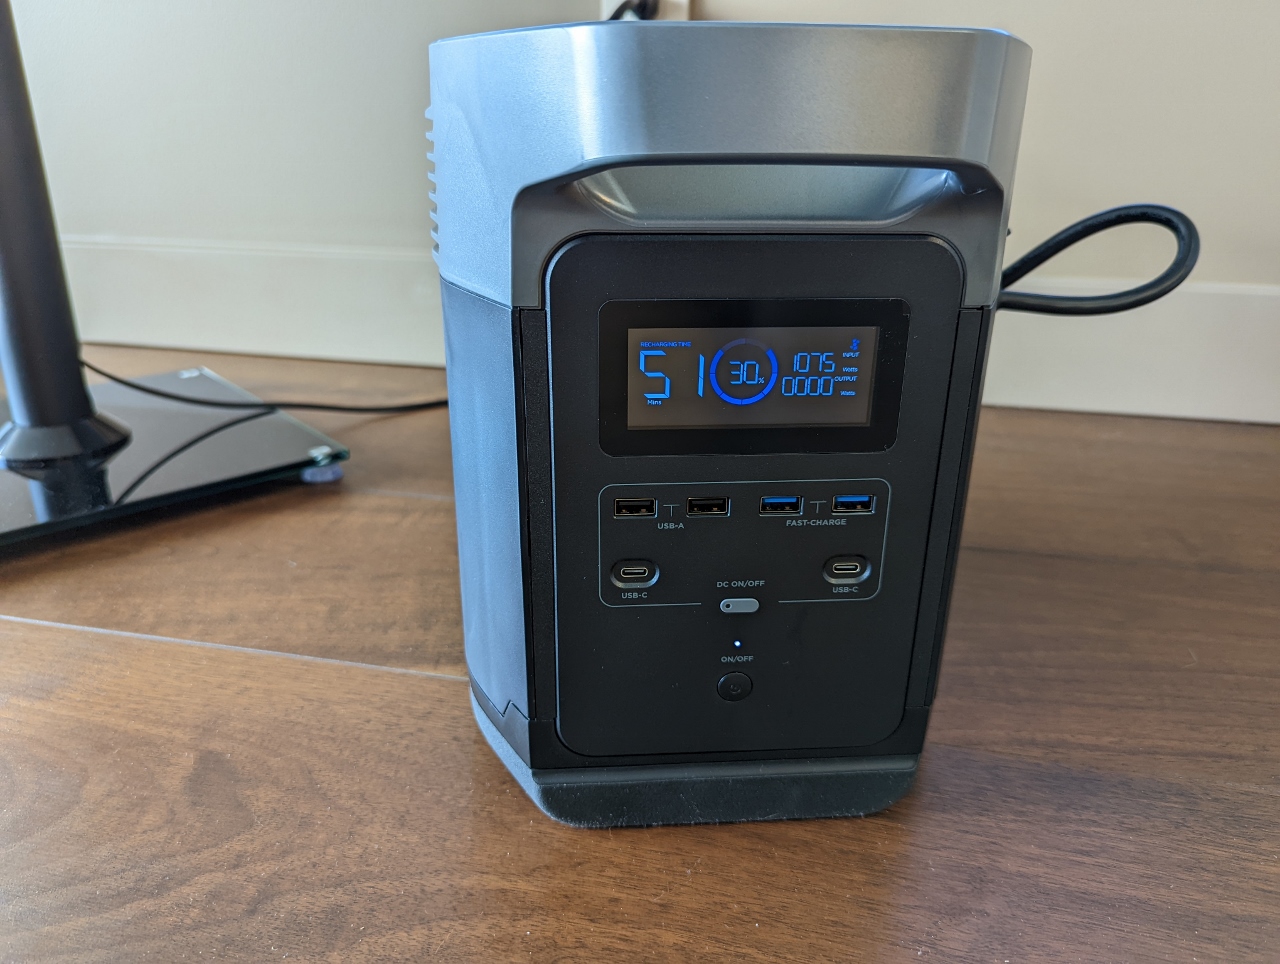
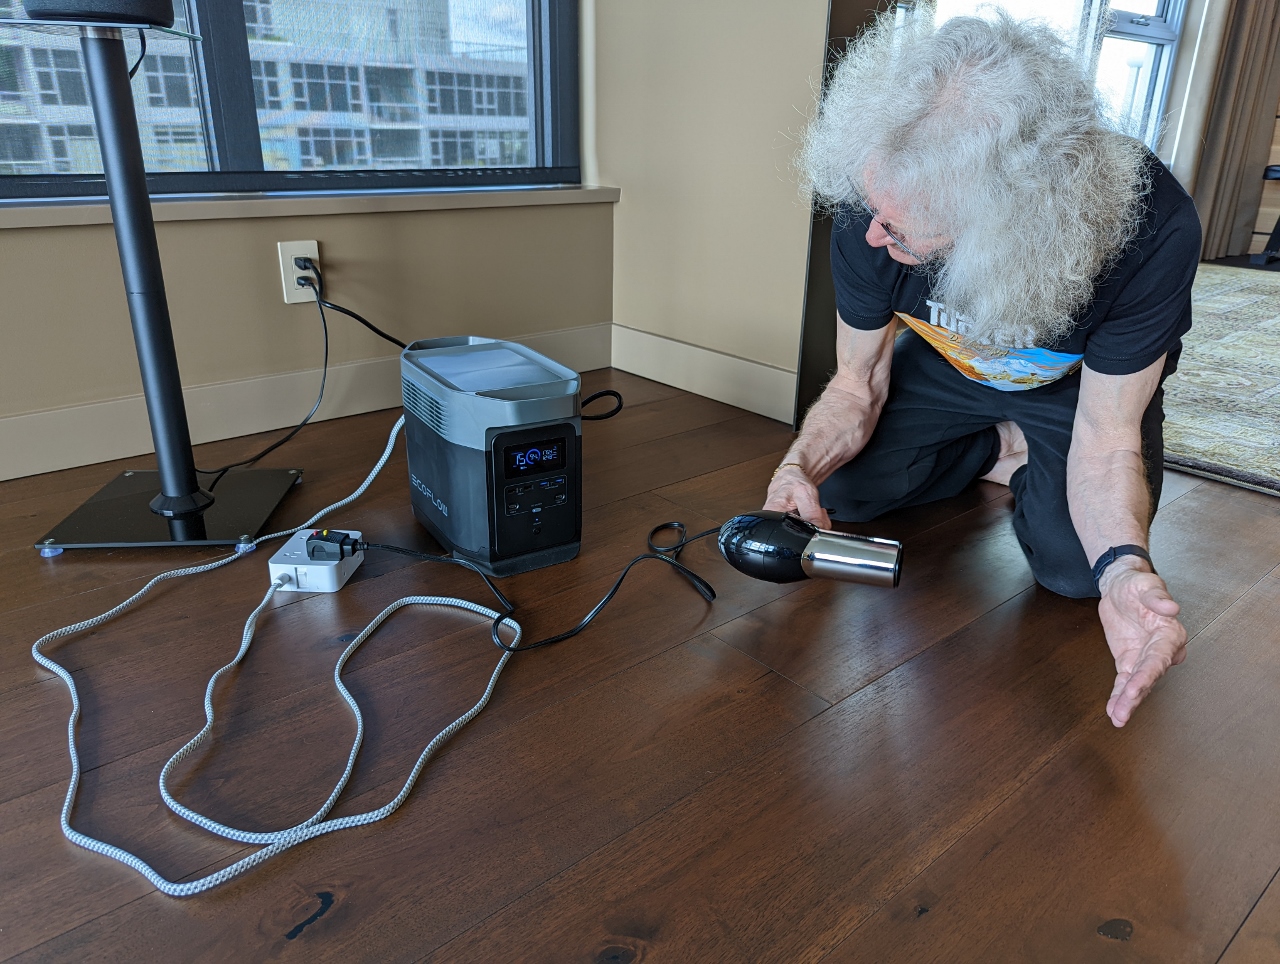
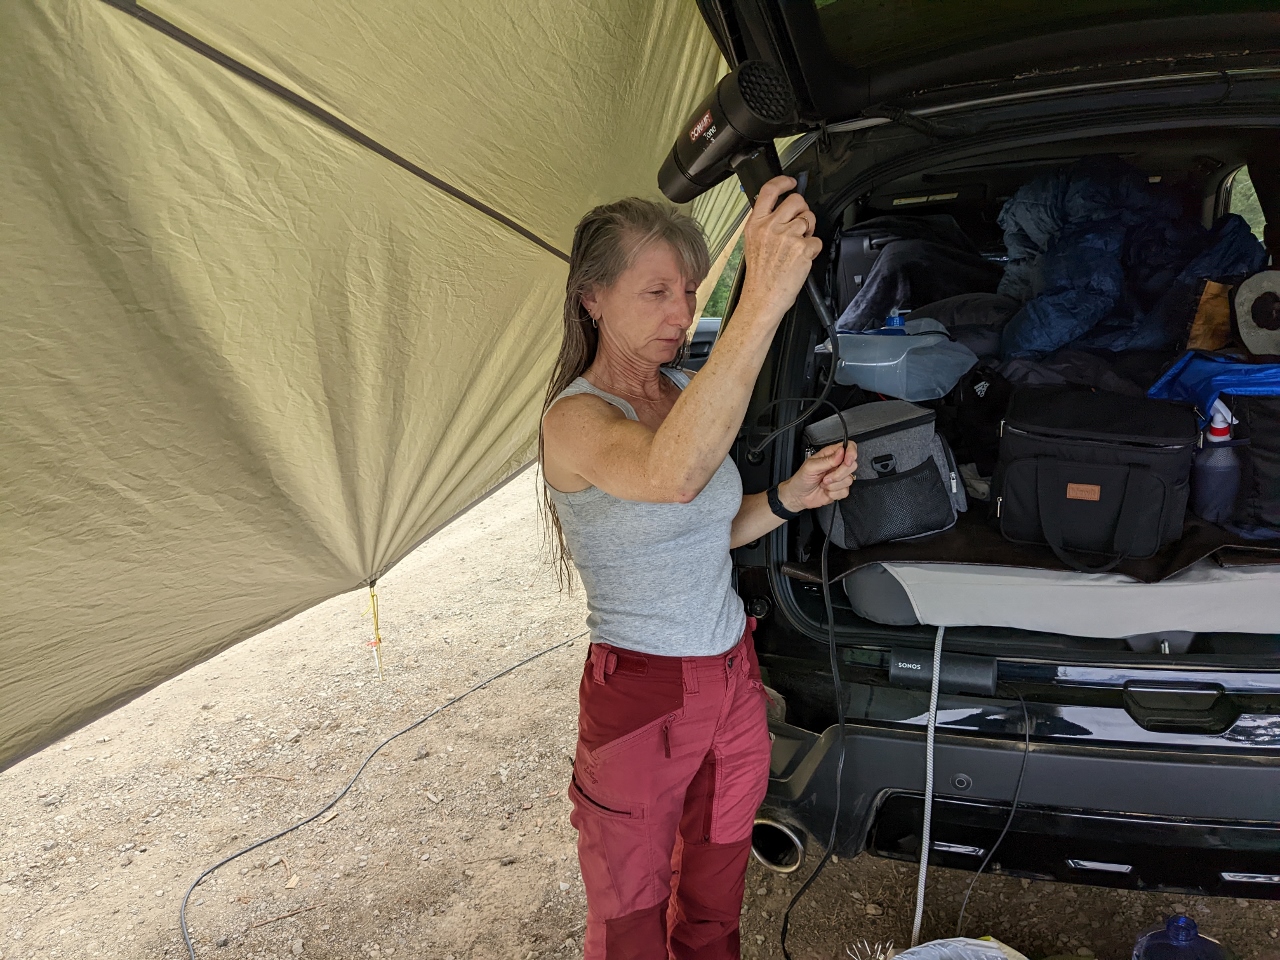
The EcoFlow DELTA Max 2000 can supply power via a 12-volt via cigarette lighter outlet, USB type-B connections, and 6 120-volt AC connections. After initial charging at home, our first test was to supply 12-volt power to inflate our Luno air mattress. On the 120V side, the DELTA Max 2000 can supports peak loads of 3,400 watts and had no problem supporting the 1,800-watt draw from a hair dryer.

|
|
| Left: Testing the EcoFlow power supply, left using the 12-volt to inflate our Luno air mattress, left, and with a high load of an 1,800-watt hair dryer. | |
Another appeal of the EcoFlow was their excellent App that supports remote control and monitoring. The screenshot of the App below shows the charge level is at 53.79%, the battery is charging with input of 1,700 watts, and no draws are on any of the AC, 12-volt or USB outputs. (The 1000- and 1,300-watt DELTA base models aren’t supported through the App, so if this is important, you’ll need the DELTA Max or another model.)

|
|
| The excellent EcoFlow App supports remote control and monitoring. | |
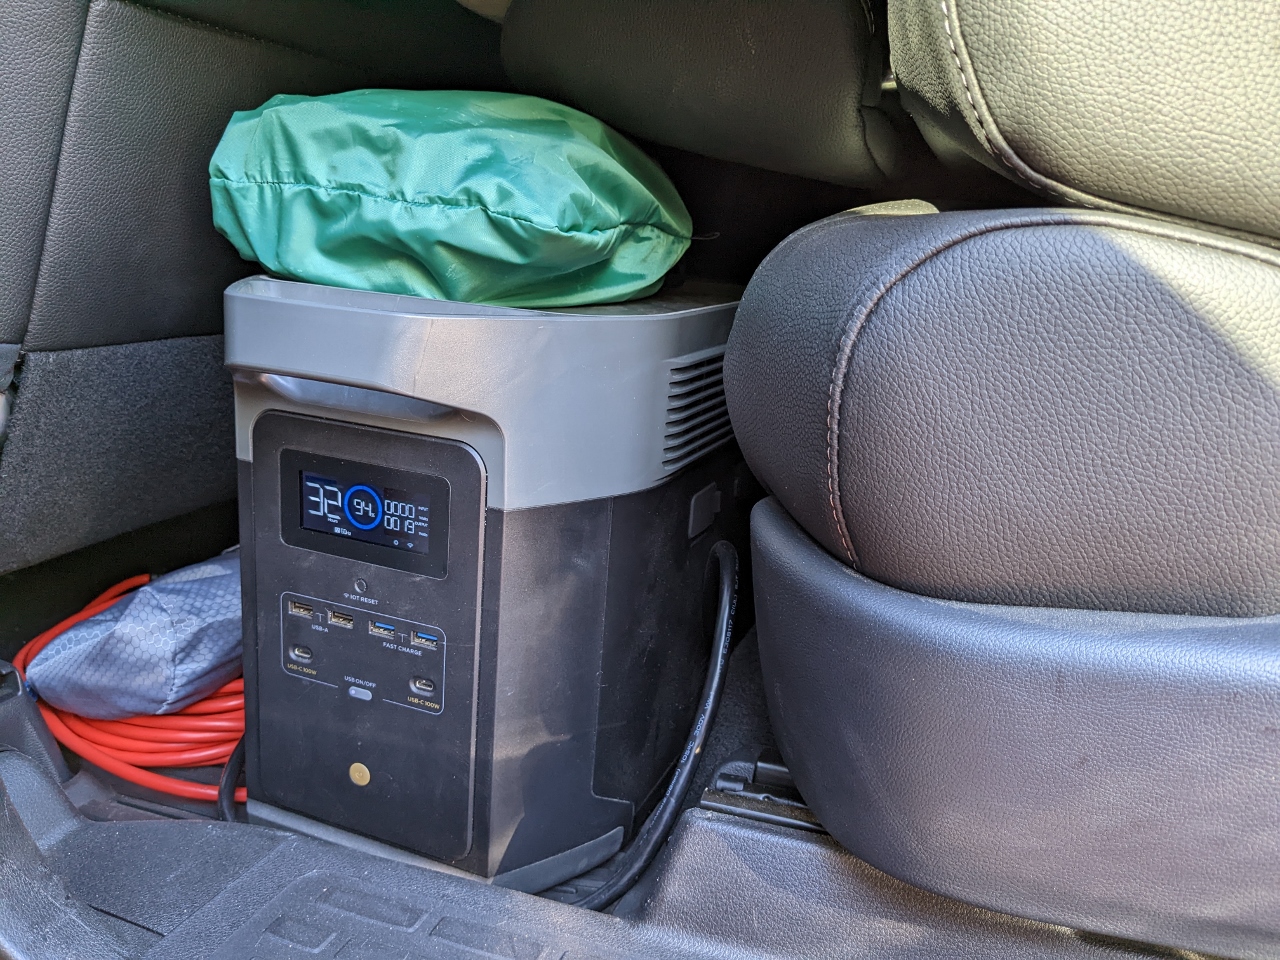
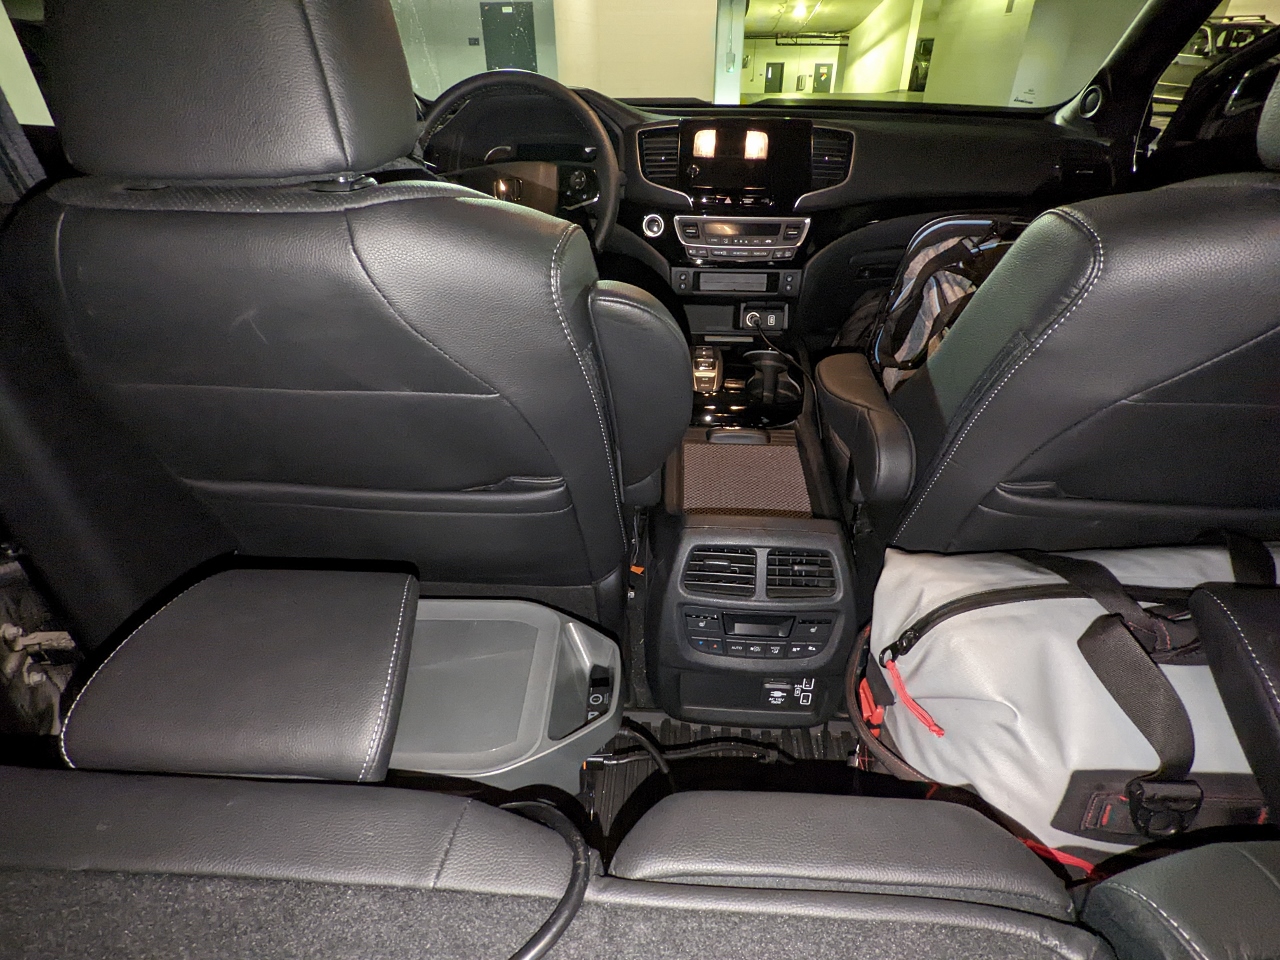
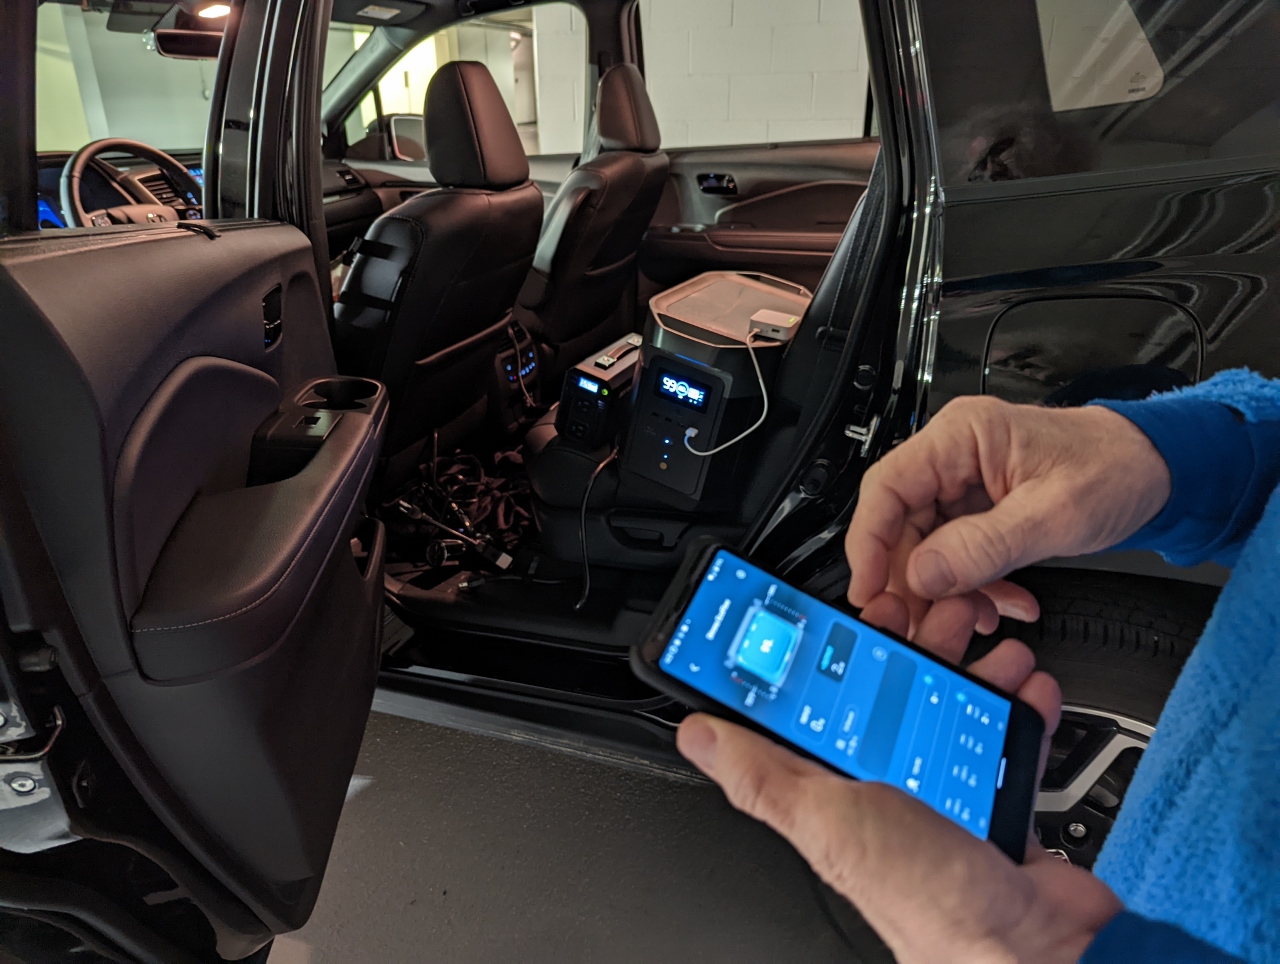
When we are out camping, we keep the EcoFlow in the footwell behind the driver’s seat and keep it plugged into the car’s 12V supply. That way we we’ll get 100 watts of charging whenever the car is running.
To conveniently power our 120V devices, we run a waterproof power strip through the truck bed and out to our camp table. The cable is narrow enough that we can still close and hatch and lock the car at night or if we want to go for a hike.
|
|
| We keep the EcoFlow in the footwell behind the driver’s seat, left, and always plugged into the 12V supply in the forward console, right. | |

|

|
| A waterproof power strip run through the truck bed, left, brings power to our camp table but still allows the hatch to close so we can lock the car at night or if we are out for a hike. If you look closely at the power strip picture on the right, you’ll see it also has USB outlets, with two at the far side in use (click image for a larger view). | |
At home, we can charge the EcoFlow quickly and easily by just plugging it into a wall socket and enabling fast-charging at 1,800 watts. The battery capacity is sufficiently large that no charging is required on overnight camping trips or even two-night trips when we’re not using Starlink. But we do need to charge on longer trips. The EcoFlow has optional solar panels for charging, but they are rather bulky, delicate, and expensive. And sunny weather is sometimes scarce here in the Pacific Northwest. So we considered other options first.
Our Honda Passport has two accessory outputs, an AC power outlet designed to supply power for appliances up to 115 volts that are rated 150 watts or less and a 12V socket rated at 180 watts (15 amps) or less. Through the App, the EcoFlow draw can be adjusted downward to avoid overloading the 120V power source. But the lowest setting is 200 watts, still more than the Honda 120V circuit can deliver. So that option wouldn’t work.
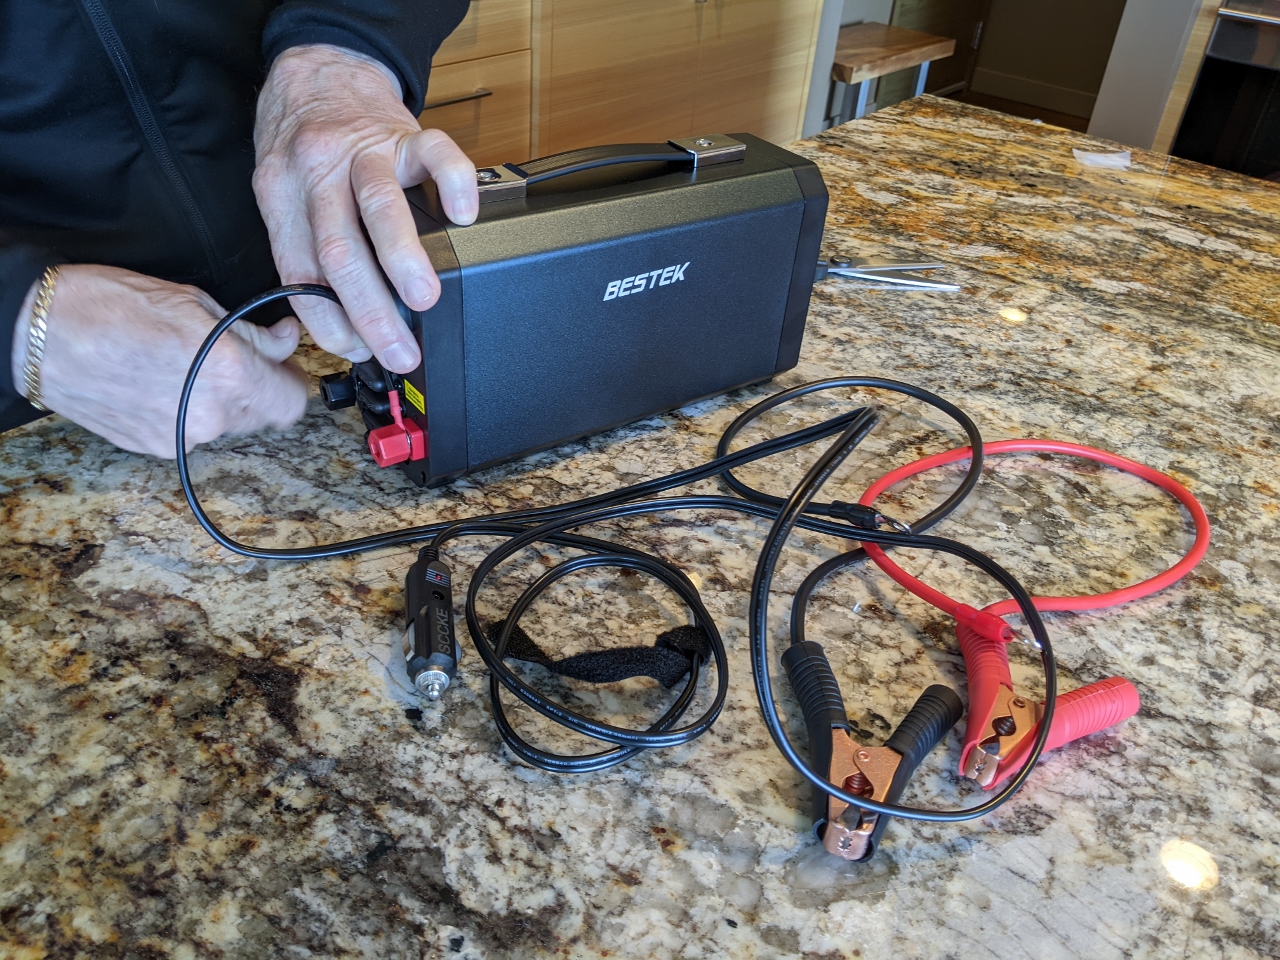
The EcoFlow 12V charging system is only capable of accepting 96 watts, so it will work, but it would most of the day to charge the system. For faster charging, we purchased a Bestek 1000W inverter.
The first picture below shows the Bestek 1000W inverter out of the box. The second picture is a test of charging the EcoFlow through the car battery with the engine running. We have attached the inverter to the Honda’s battery with the accompanying cable, and have plugged the EcoFlow into the AC output of the inverter via the orange extension cable visible at left. To provoke a charge, we’re generating a big draw with a hair dryer. This charging method worked quite well and is much faster than using the car’s 12V source. With this approach, we can adjust the EcoFlow’s charge rate up to the maximum rate prior to discharging the car’s battery. Basically, we’re taking all the power available from the alternator, and this produces very good charge rates. This ability to control the charge draw was one of several reasons we wanted an EcoFlow model that supported the App.
|
|
| The Bestek 1000W inverter out of the box, left, and charging the EcoFlow through our car battery. | |
Charging through the car battery worked well, but we’d prefer a solution that wouldn’t require opening the hood and attaching the inverter to the battery, so investigated alternatives. The Honda’s 12V supply is rated to produce only 180 watts, but James noticed it was fused to support 240 watts. Our theory was the circuit probably would be capable of delivering the minimum 200 watts that the EcoFlow draws over the AC input. Armed with some spare fuses, we tested this theory by plugging the Bestek 1000W inverter into the 12V system and charging the EcoFlow via the inverter. The fuse never blew, but as the draw went up over 180 watts, the Honda power delivery system went into lockout.
We wasted some time on this one, not understanding the lockout system. The power socket appeared to have failed, with no fuses or breakers tripped. The fault can be cleared by just shutting off and restarting the car, but it took us a while to figure that out.
|
|
| Attempting to draw more than 180 watts through the Honda’s 12V supply. | |
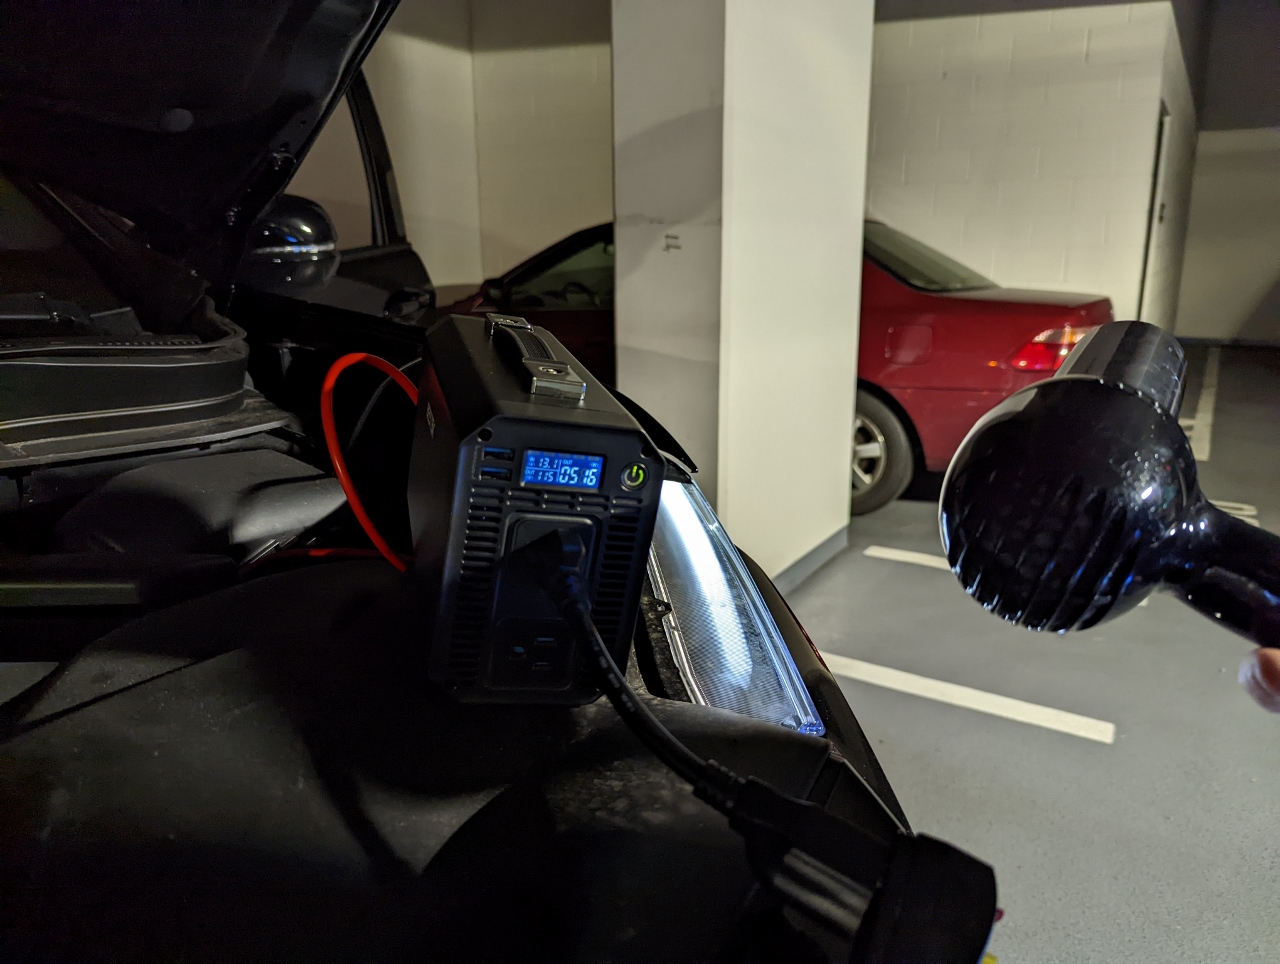
To charge the EcoFlow at camp, we attach the inverter to the car battery and run an outdoor extension cable back to the EcoFlow. One of the features of the Bestek 1000W inverter we really like is the voltage display, so we can be sure we’re not discharging the car battery. We tuned the EcoFlow charge rate to ensure the battery voltage stayed above 13 volts. In the picture below, the car battery is at an acceptable 13.5 volts, and 510 watts is heading to the EcoFlow.

|

|
| Charging the EcoFlow at camp. An inverter voltage display, right, is an important feature to ensure the car battery is not discharging. | |
Running the engine for about three hours will recharge the EcoFlow from 50%, depending on load levels. The screenshots below show various aspects of the EcoFlow charge state before, during and after charging.
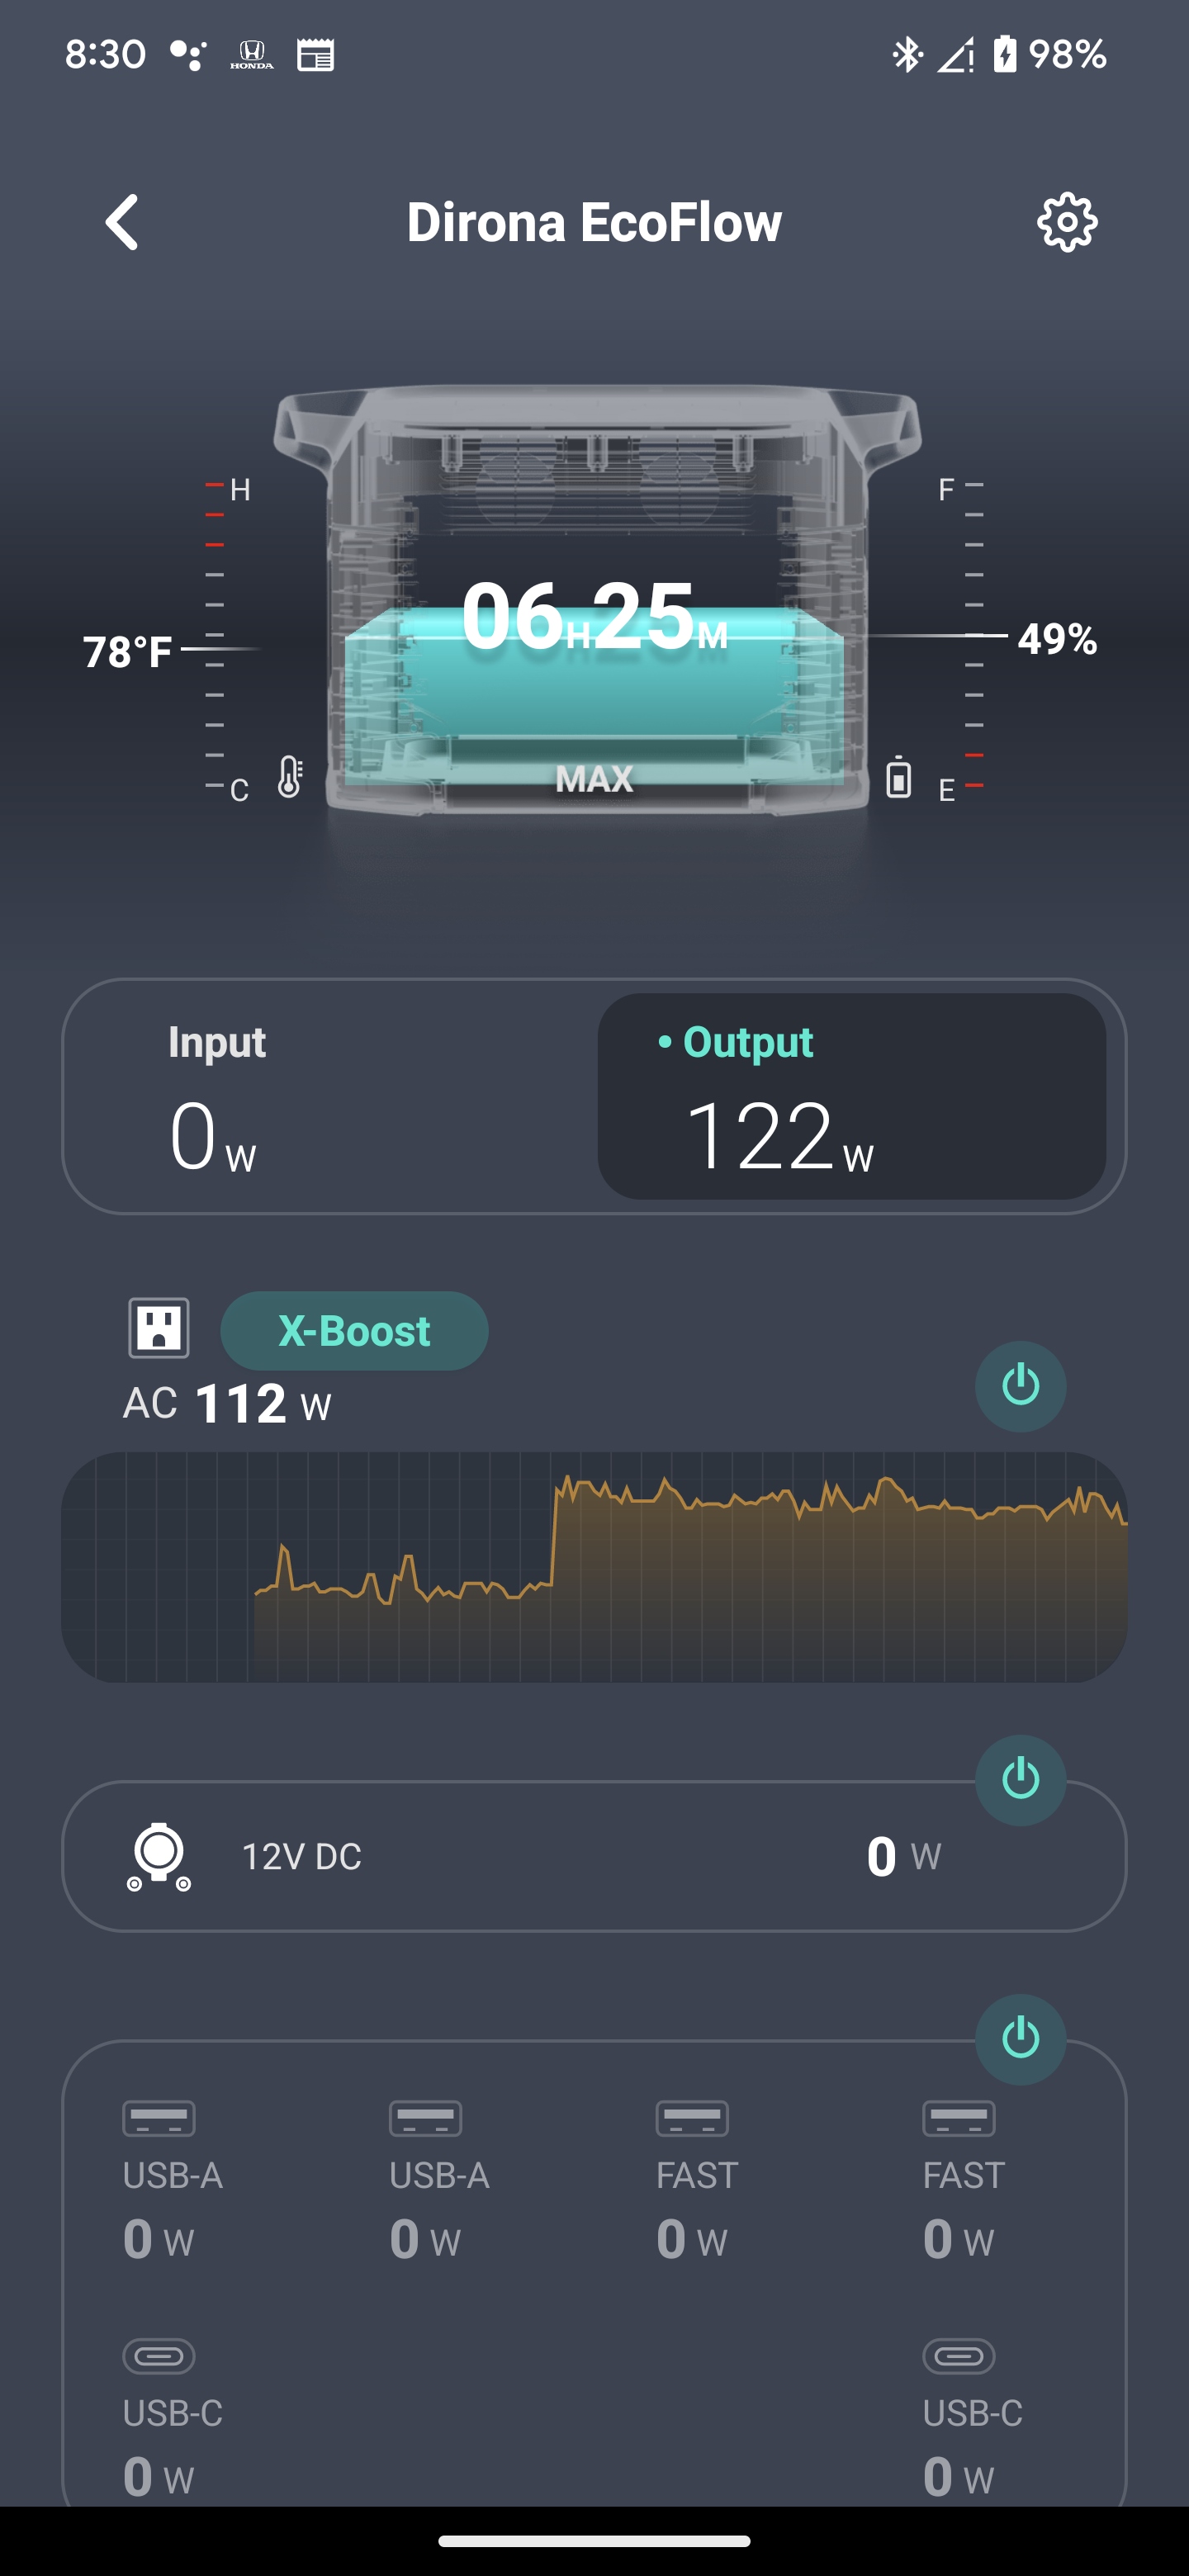
The first screenshot shows the EcoFlow draw a few hours after we got up in the morning. From fully-charged when we arrived at camp the day before, the charge level is down to 49% with 6:25 of power remaining at the current load levels of 122 watts. The power draw graph shows the spike up to a pretty steady 120-125 watts of draw when we got up and turned on the Starlink and plugged in our laptops and other devices.
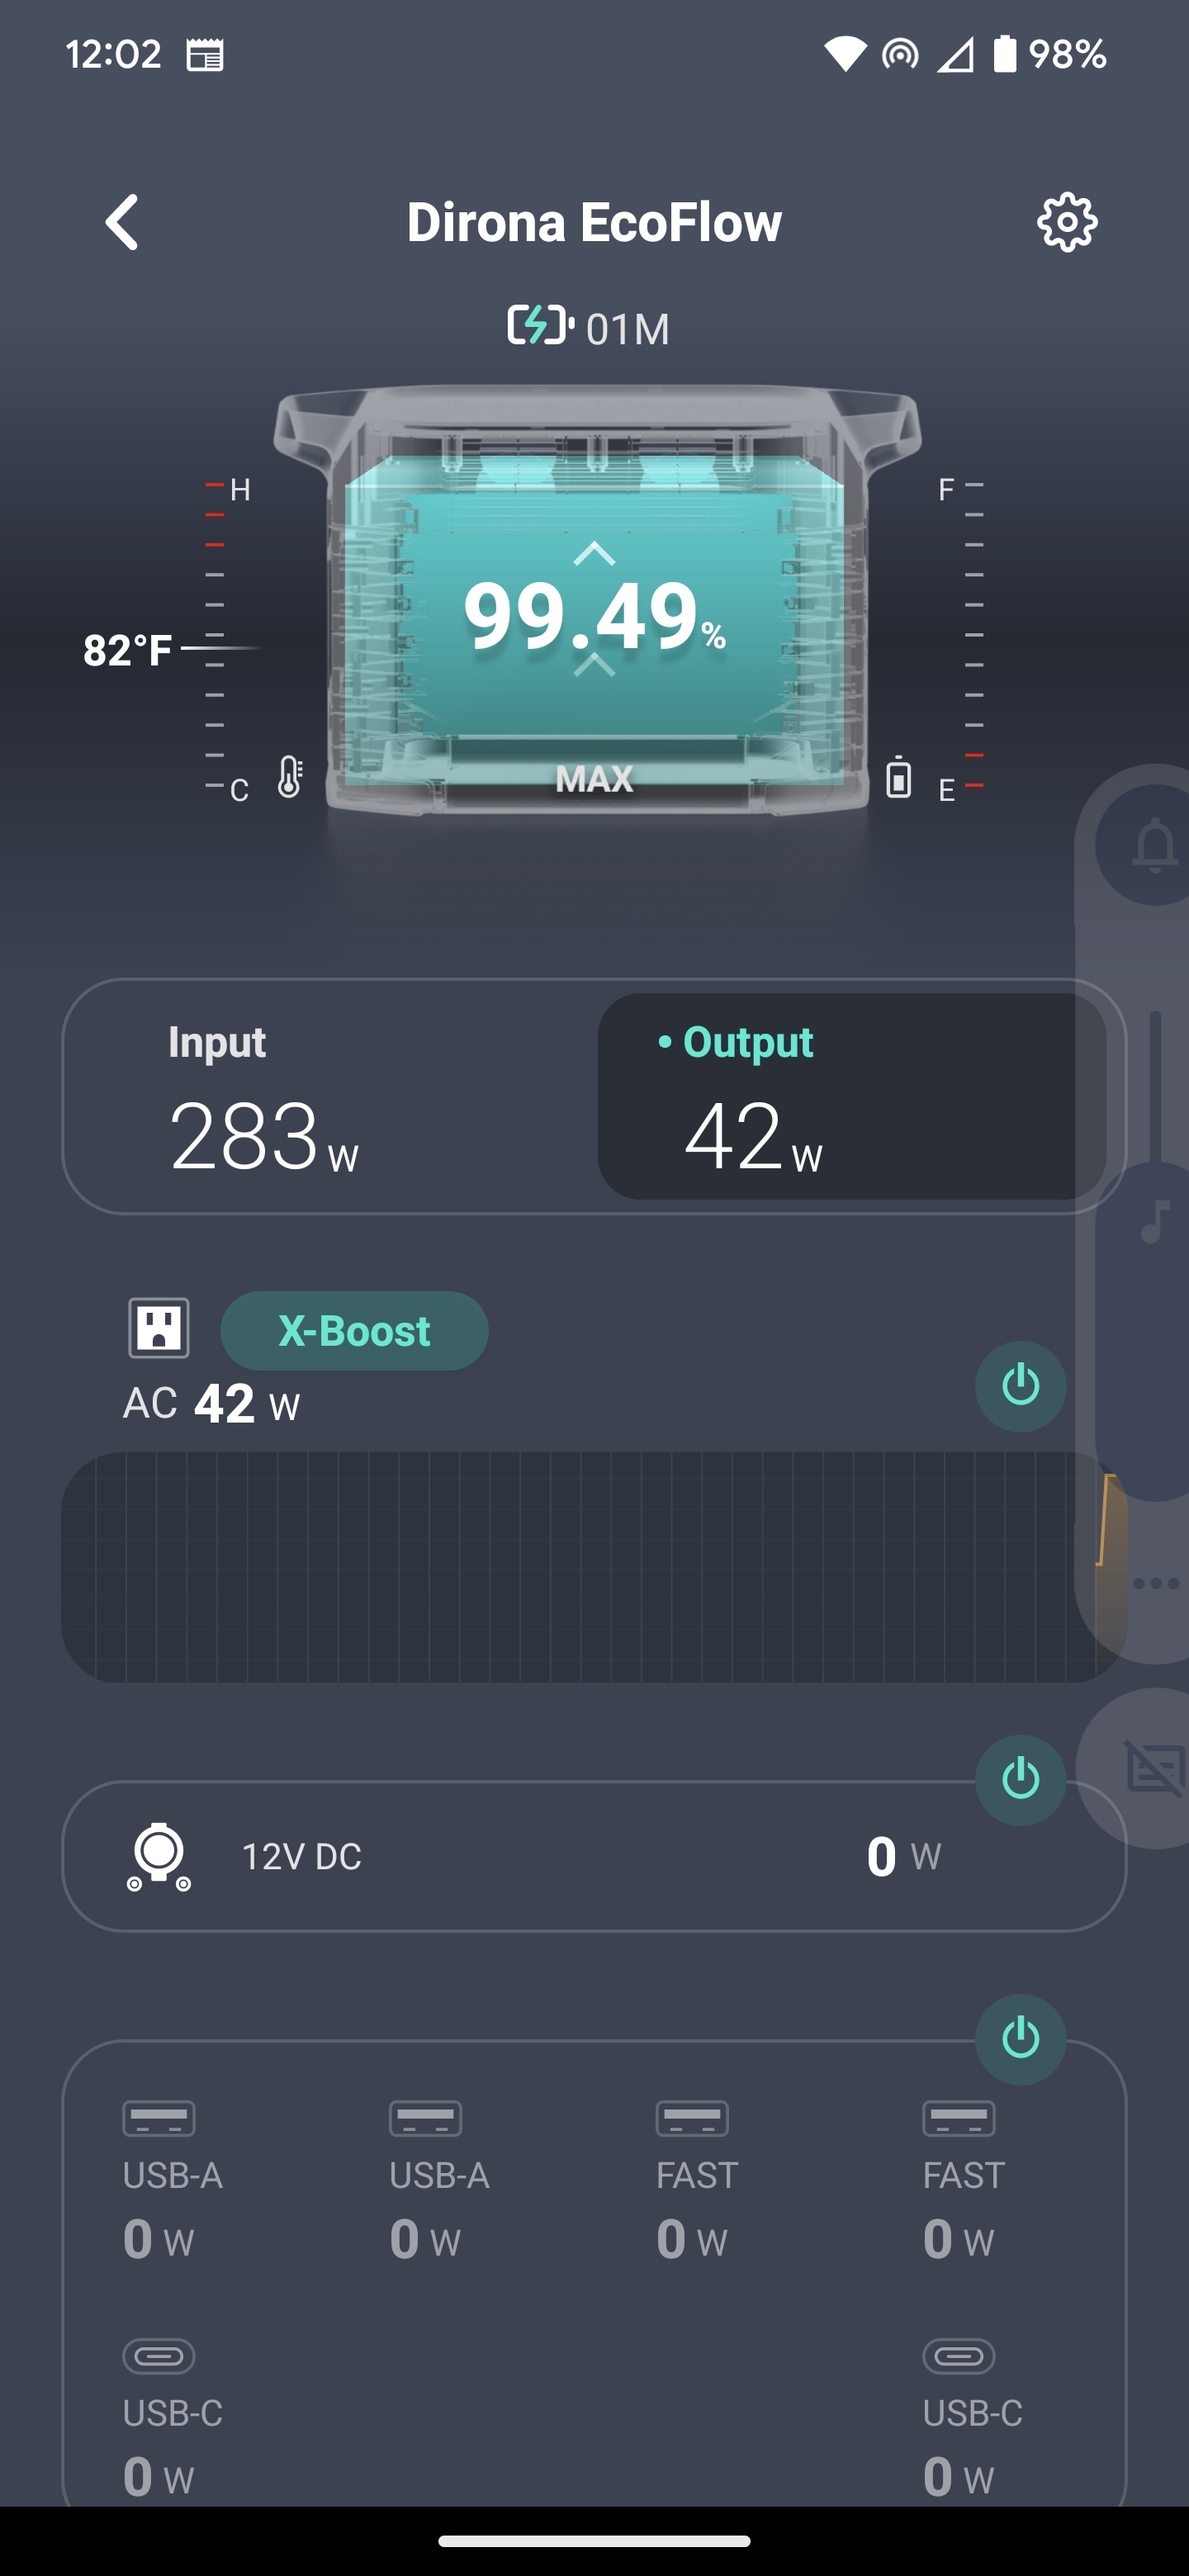
In the second screenshot, taken shortly after the first, we’ve started charging. We’re still drawing a fairly high 95 watts, but now have an input of 479 watts. We should reach full charge in 3:11 at current input and output levels.
The third screenshot was taken 3:20 after the second, when the EcoFlow is very close to fully charged. All our devices by then are also fully charged, so our draw is down to about 42 watts, mostly from Starlink. The EcoFlow has gotten warmer during the charge process, increasing from 78°F (25.6°C C) to 82°F (27.8° C). The car doesn’t provide discrete fuel level readings, but we estimate the charging process consumed just under a gallon of gasoline.
|

|
|
| The EcoFlow state before, during and after charging. | ||
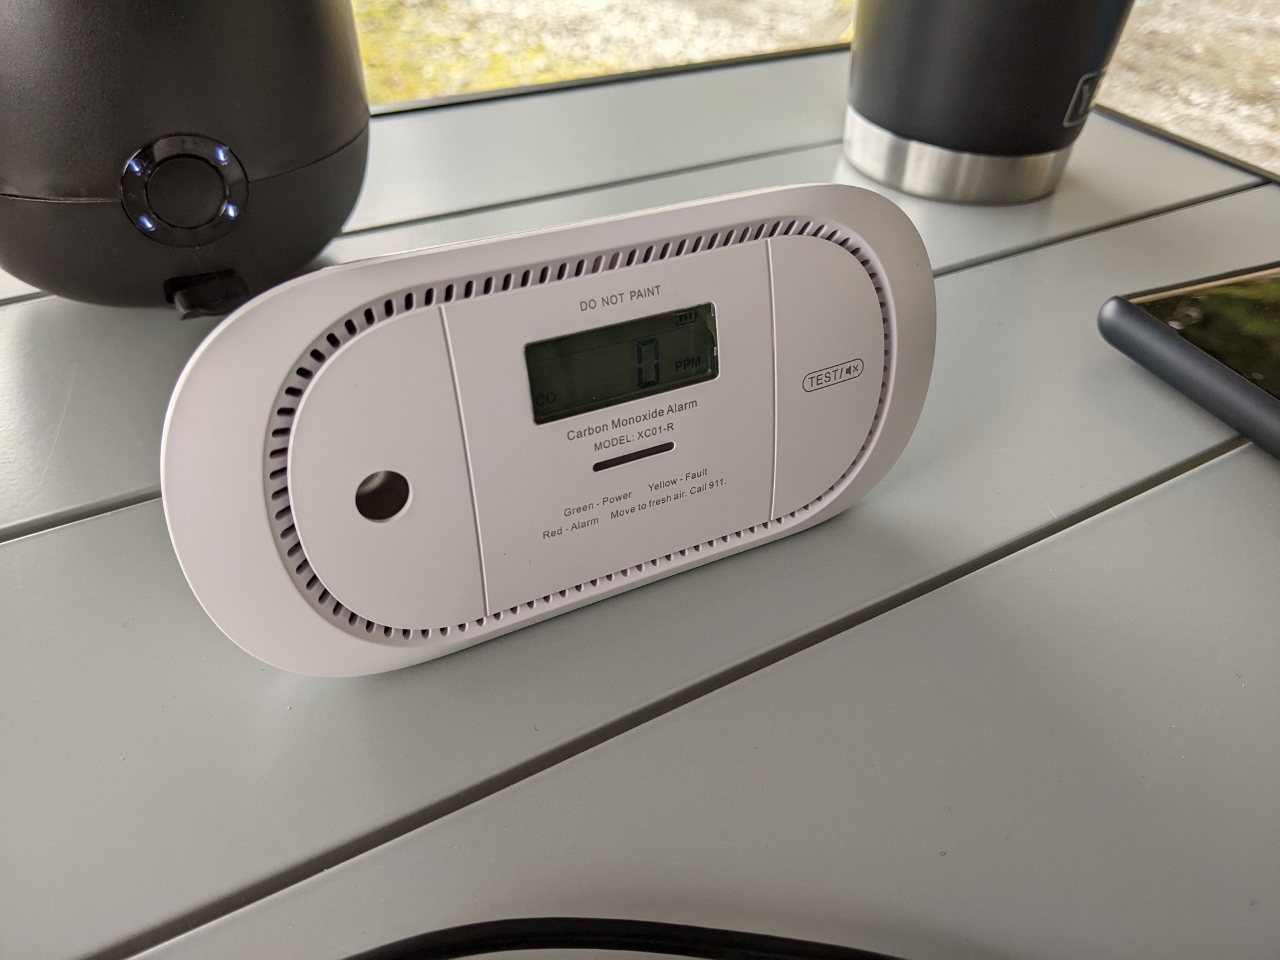
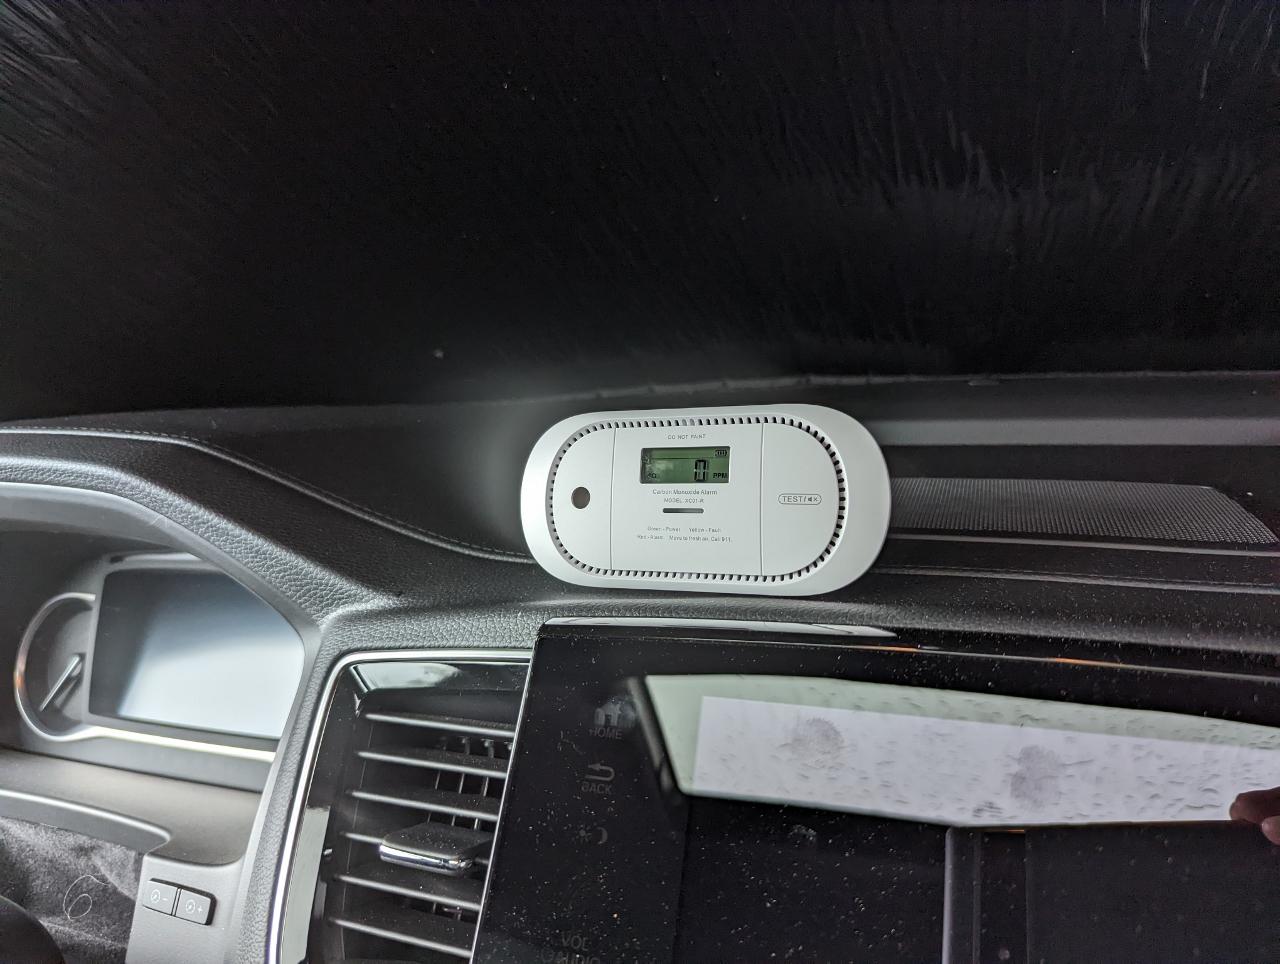
One slight disadvantage of charging the EcoFlow by running the engine is that our camp table is directly behind the car. This isn’t bothersome, as the Honda runs remarkably cleanly and we don’t notice any odor at all in the slight breeze usually around the camp site. But to be on the safe side, we place a small carbon monoxide monitor on our camp table if we’re running the car to charge the Ecoflow and put it on the car dash at night when we’re sleeping. We’re not likely to have problems, but this is an easy way to be safer.
|
|
| We use a small carbon monoxide monitor when charging the EcoFlow, left, or sleeping. | |
Our draw generally is below 140 watts, and even less when not using Starlink. But we occasionally take advantage of the X-Boost support for peak loads of up to 3,400 watts. After taking a shower at camp, it’s nice to be able to use an 1,800-watt hair dryer without issue. And we once ran out of fuel for our propane stove and instead could use our electric travel kettle to make coffee and tea in the morning.
When the EcoFlow is charging, the App can control how much it draws, allowing it to run on sources not capable of delivering its full 1,800-watt charging load. The downside of the EcoFlow charge-limiting implementation is that any load put on the EcoFlow adds to the overall charging load above the limit. The net is you really can’t put high loads on when charging on a restricted source. If we’ll be using a high-draw appliance while charging, we temporarily disconnect the charging circuit .
|

|
| The DELTA Max 2000 has no problem supporting the high load of an 1,800-watt hair dryer, left, or a 700-watt travel kettle. | |
The EcoFlow DELTA Max does have a few minor annoyances. The charge-limiting feature has a minimum of 200 watts at 120V. But our car’s built-in inverter supports only 150 watts at 120V, so we can’t use it to charge the EcoFlow. We instead fall back to using the car’s 12V 180-watt power source, which is a nice solution except that the EcoFlow won’t accept more than 96 watts on the 12V charging side. That means when using in-car charging sources for the DELTA Max we can’t charge faster than 96 watts. That’s sort of unfortunate given the car is capable of supplying 50% higher than that.
A last issue where EcoFlow could have executed better is App connectivity. We wish it were possible for the DELTA Max to remember any network it’s been connected to previously and jump on to it automatically, similar to the Sonos Roam. The DELTA Max also will only connect to 2.4g networks, a requirement that is not well-documented. And once the mobile device and the EcoFlow are on the same network, they should be able to communicate regardless of whether there’s external connectivity or not.
We bump up against that last limitation frequently when we are using Starlink for internet connectivity. Before going to sleep, we turn the Starlink off to reduce power consumption. We can easily do this remotely via the App by disabling the EcoFlow AC output. But losing internet connectivity also disconnects the phone from the EcoFlow. While still in bed the next morning, we’d like to be able to remotely re-enable the AC circuit and internet connectivity, but no longer can connect to the EcoFlow. It’s a minor issue, and one that we plan to solve with a wireless remote control outlet instead of disabling the AC circuit using the EcoFlow remote control. Other models of the EcoFlow, such as the DELTA Pro, support Bluetooth and wired connections, so perhaps this will be available in future versions of the DELTA Max as well.
These short-comings notwithstanding, we absolutely love the product and haven’t seen anything in the market that matches it. The Ecoflow DELTA Max 2000 has completely solved the problem of having adequate power at camp in a quiet, non-intrusive way, and the App overall is very well done.
|
|
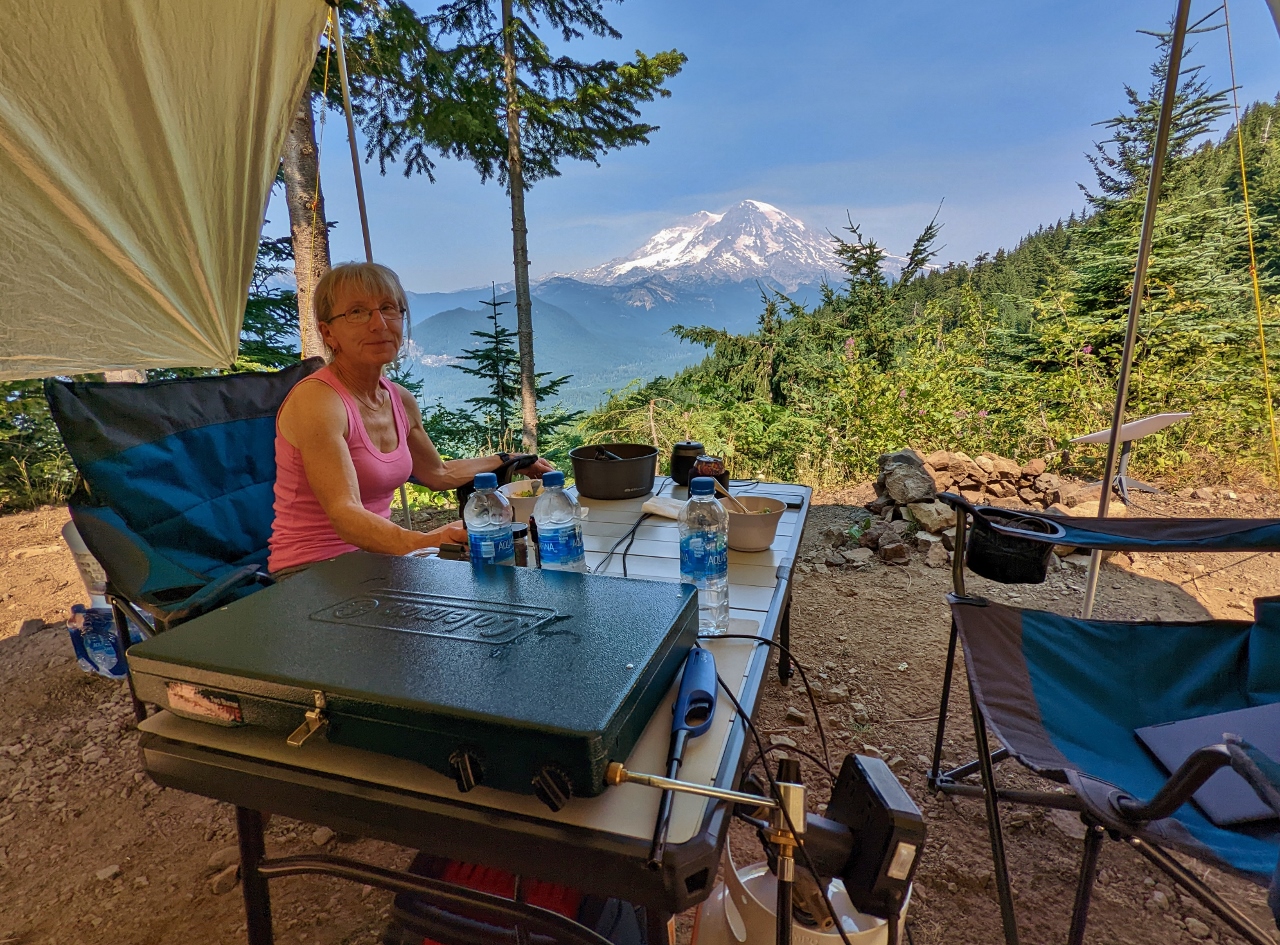
| A cellular-free campsite with a fabulous view to Mt. Rainier. But we have internet connectivity, through Starlink, at right, and an EcoFlow DELTA Max 2000. | |
Great write up. I found it while searching why the charge limitation was not being enforced and it is because I also have a high load on it. I was hoping it would just supplement the extra output it needed over the limite input but seems it is always going to pull the output power needed from input.
The other annoyance I also experienced is connecting to it when not on our home wifi and having to manually do the direct connect via wi-fi… which is not ideal. My fix for that is I’ve purchased a mobile hot spot from my carrier who charges $5/mo for their lowest data plan and I keep the hotspot plugged into the Delta Max, and it connected to the hotspot wifi. Now I can connect to the Delta Max from anywhere my phone has data/wifi as long as the Ecoflow’s hotspot also has data… OR as long as I connect my phone to the hotspot wifi as well. Kind of silly that they did not include bluetooth as a connection option on such an expensive device. I can’t imagine it would have raised the cost to produce the device any significant amount.
I agree with you on both points. It would be much better if EcoFlow limited power draw rather than charge rate. It’s not a great design choice and it makes the system harder to charge on low amperage power sources.
I like your solution to the connectivity problem. We did something related where we use a travel router so the EcoFlow can stay connected to the travel router and then the travel router can be quickly connected to the connectivity source whether it be cellular, Starlink, or WiFi. It works and is much simpler than having to go through the WiFi connectivity dance with the Ecoflow each time we change connectivity sources. Your solution has the advantage of giving you remote access to the EcoFlow and the solution we’re using has the advantage of working in areas without cellular connectivity. Thanks for passing along your solution.
Super interesting thread James – one we’ve been working through in real time. We’ve been traveling across the US in state parks & national parks running Starlink etc. off of 600ah BattleBorn + 800 watt solar + Victron Multiplus Inverter (in Airstream trailer). Even with this capacity finding an automatic way to spin up and spin down the Starlink draw has been a point of focus. I’m ultimately hoping to eliminate the duplicative function of the Starlink router and have it utilize Pepwave mobile router directly via PoE. Others have already figured this out. In addition, others have managed to get it running 12v to also eliminate the overhead of power inversion. Suspect in the future this will be simplifying for the boat/rv use case.
In addition to the Pleasure Way Recon, if you haven’t seen them also check out the Airstream Interstate 24x. We were just checking them out at Airstream HQ. https://www.airstream.com/touring-coaches/interstate-24x/. They have an E1 energy package option that’s pretty insane.
All the best
Thanks Ryan. We’ll check out the Airstream Interstate 24x as you recommend.
As usual you have come up with very clever solutions to your camping needs. I have nearly zero knowledge about this type of equipment, but I have been looking at small Class B van campers and some of them come well-equipped with solar power, lithium battery banks and inverters to handle power needs off grid. I am fascinated by van campers like the Pleasure way Ontour 2.0. You do well with the Honda but a 19′ Mercedes Sprinter van or Ford Transit van camper might offer much more comfort and capability and still fit in a normal garage parking slot.
That’s a great question: would a Van RV be better for our use case? In the general case, yes, but the answer more complex. The first complexity is this kind of camping makes a 4×4 mandatory so a Pleasure Way Ontour 2.0 wouldn’t do it. But the Pleasure Way Recon 4×4 would be a very good choice and it’s one we have been looking at. It’s a bit more expensive than the Ontour but it would do the job 95% of the time. The upside of a camper van is we spend 40 min setting up camp and about the same to tear down where a camper van would be closer to 10 to 15 min. And a camper van is more comfortable in cold weather. All upsides. The only real downside is it’s 3x the cost and a camper van is a less general vehicle. It’s not an ideal vehicle for shopping trips or going to work.
On the whole, I think the camper van would be an ideal choice for us. The downsides of camper van is for us it’s slight (but only slightly) less capable in rough terrain and our condominium has only 6’10” of clearance in the garage and RVs are not allowed. It’s that last factor that has been blocking us. Having to drive to a storage facility to pick up the van and then take it from there is a bit of overhead we don’t love. We may very well end up with a 4×4 camper van but so far, not being able to park it at home has discouraged us from making that move.
You would enjoy looking at amazing camper vans being built by a guy in CA named Brandon Buckley. I think he is on Instagram under bucksd but I saw You Tube video of one of his builds. He employs very interesting technology and his vans are so slick your building would never know it was an RV.
Thanks for the pointer. I love the idea of stealth RVs but, even there, the normal height Sprinter vans are 7.8′ and the high roof versions even more but we only have 6’10” in our building garage. If we do go with the camper van option, we’ll have to store it separately from the building.