.jpg)
Steering is a great area to be picky about in overall mechanical system health. About three months back, we noticed a tiny amount of play at the spherical bearing that forms part of the rod end where the steering cylinder connects to the rudder. The play was minor, but spherical bearings should exhibit close to no detectable free play.
Replacing the rod end is actually a fairly easy task, and we have the spare. So, we put it on the list to be changed before the offshore run to New Zealand. That 1,100 nm stretch of water isn’t that long, but many boats have been lost there over the years, so it’s worth being careful. Over the last few hundred hours, we noticed the bearing has loosened up considerably more and the play was quite noticeable. Since we had a spare hour, we figured we would just get it changed.
The job is super-easy: the cotter pin holding the rod end to the rudder yoke is first removed, then the large stainless nut and bolt can be removed. Then the large lock nut on the ram can be backed off the rod end unscrewed. It’s about thirty minutes worth of work.
Once the rod end was disconnected, we noticed that the bushing in the other end of the steering cylinder was seized so we took off the other end to investigate. We found the bushing was actually heavily worn. Arguably this wear is a bit early at 3,400 hours, but we’ve seen a fair amount of rough water in the Alaska area. A day and a half in 40 kts of wind, 150 nm offshore in the Gulf of Alaska comes to mind as the most memorable.
Because the inner bearing is integral with the steering cylinder, replacing it requires replacing the entire cylinder. This is unfortunate for two reasons: 1) cylinders are notorious fluid leaders and we are lucky to have one that has never leaked a drop — we hate to replace a cylinder in such good shape, and 2) during new boat commissioning, the cylinder was replaced due to, you guessed it, leaking and it took three tries and more than a day of labor with two technicians to get it properly bled. We hated changing a non-leaking cylinder since the new one may leak. And we really hated the prospect of bleeding the system, especially at anchor, since we can’t move until we get it right.
.jpg)
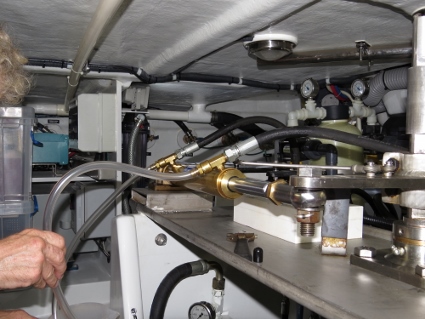
Changing the cylinder itself was easy. Except for bleeding, the entire job was fully done and everything cleaned up in under an hour. Then we went after bleeding it. Our first attempt was to pour steering fluid into a plastic container and insert plastic extension hoses on each bleed screw (see pictures below). Then we cranked the wheel back and forth, pumping out the air and pulling in new fluid. This was working pretty well, but wasn’t all that fast.
As we bled the system using this technique, the fluid reservoir was getting low so we took off the fill port seal and topped it off. While doing that, we noticed the fluid level was going down fairly fast when the fill port plug was removed. It turns out that if you leave the bleeders open down below and remove the fill port plug, the weight of the hydraulic fluid slowly pushes fluid out of the two cylinder bleeder ports. This is actually a fairly useful discovery. We let that process continue and then took the fluid that had come out below and used it to top off the reservoir, and repeated the process. This bled the system in minutes. We then closed everything off and tested it. The steering had exactly the right number of turns lock-to-lock and was rock solid when it hit the travel limiters, confirming that it was fully bled. And the autopilot pumps are all working correctly.
.jpg) |
.jpg) |
The only issue we found with this five-minute bleeding process is that it doesn’t bleed the upper helm pump, since the pump is above the reservoir. This is an unfortunate design, but unavoidable, in that here is no higher point in the house or flybridge area for the reservoir. We managed to find a quick solution for this one as well. We opened the fill port in the upper helm pump, pushed in a funnel, and filled the funnel to near the top. Then we spun the upper helm wheel, keeping the funnel filled, which keeps it from sucking air but still allows excess air to escape. We also opened the bleed port in the steering manifold. This valve is normally closed but can be opened to bleed the upper helm pump. Again, the wheel was spun in both directions and then everything was closed off. We retested everything and it was all good.
The final test is if the upper helm pump collects more air during operation–the cause of all the repeat bleeding attempts during new boat commissioning. We’ll keep an eye on it, but it’s been quite a few hours and all is rock solid, so we’re pretty sure this one is done. It’s nice to have a brand new steering ram on Dirona for the crossing to New Zealand and also the one later this week to Vanuatu. And, it’s good to have systems for bleeding the steering in minutes instead of hours to days.
I posted this in general comments by mistake.
Your steering ram repair was an interesting read. Thank you for posting it. When you changed out the steering ram, in one of the pictures I noticed the rod end was snugged tight between the bolt and the nut. Do you tighten that completely, or just snug it up? Also, is your bolt threaded all the way, or is it a shoulder bolt?
The rod end needs to be torqued up to grade 8 bolt specs. The loads on it are enormous and even the slightest movement starts to wear which causes further movement and it’ll fail rapidly. It probably should be a shoulder bolt to get the benefit of the full surface support but that wasn’t the manufacturer choice.
Exactly Frank: Capt’n it’s the Dilithium Crystals. She can take it no more.
–jrh
I can’t help but imagine Jamie with a Scottish accent … "I’m working as fast as I can, captain!".