Our generator showed a light misting of oil around the generator cooling fan a month back. At just under 7,000 hours, it’s a bit early to be leaking, but it’s not a huge issue since rear main oil seals don’t fail catastrophically nor even quickly. It just means that in the next year or so, we’re going to have to replace that seal. Unfortunately it’s a big job and we don’t currently have the needed parts but rear main oil seals don’t fail fast so we’re not particularly worried about.
A month ago it was hardly even an oil mist on the inside of the cabinet enclosure. But this one has gotten worse quite quickly and in 200 hours it’s now spraying so much oil around the enclosure that it’s running down the side of the engine and the enclosure sound deadening material. It’s a real mess and getting worse fast.
Changing the rear main oil seal is a big job that we’re not looking forward to. Ron and Nancy Goldberg of Nordhavn 50 Duet sent us detailed instructions with pictures on how to do this job. We’re still not looking forward to it, but the detailed instructions from Ron and Nancy will make it a lot easier when we take it on. Also, for what might be the first time ever, we don’t have the parts we need nor a practical work-around. And because it’s a single-generator boat, we need to keep the engine in use. So, after further investigation into the problem, we decided to try a couple of experiments.
 |
Checking for Oil
Before condemning the rear mail oil seal for sure, we looked for leaks higher up that are much easier to service. Here you can see the rocker arm gasket is sealed up nicely, and the back of the rocker shaft carrier and cylinder head are clean and white. We don’t often “wish we had an oil leak at the top of the engine” but this is one of them :-).
|
 |
Rear Main Oil Seal
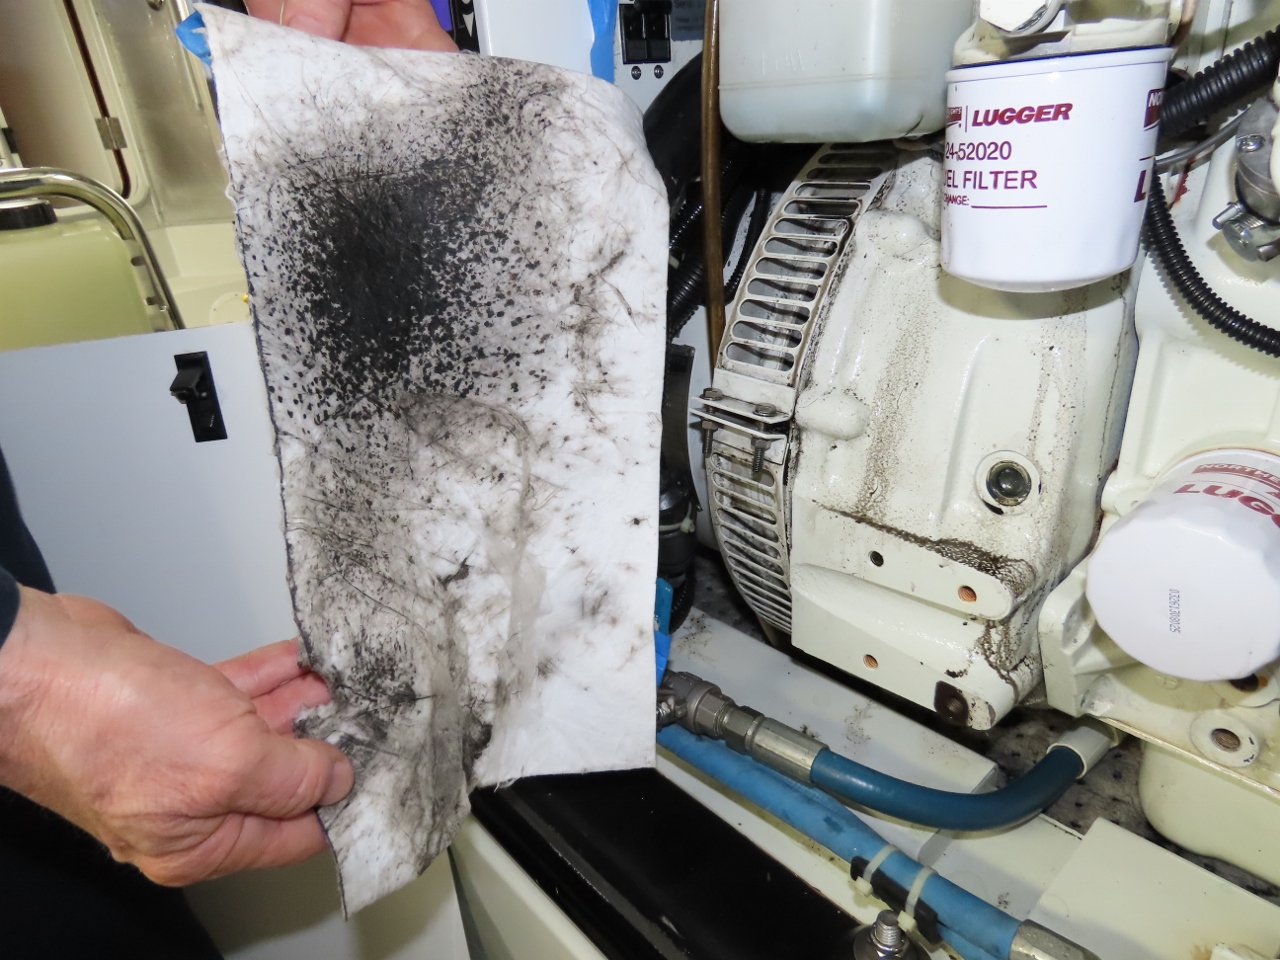
To minimize the spread of oil, we now have a oil diaper taped on so that it rests against the sound enclosure. This allows the generator to still have full cooling air flow but keeps the worst of the oil spray down. If you look carefully you’ll see that the oil running down the underneath the fuel filter and it was just cleaned 1.5 operating hours back. This leak has become serious one quite quickly. |
 |
Oil Spray
Here you can see the the oil collector after 1.5 hours of operation. The oil diaper fills in 7 to 10 hours and needs to be replaced. This is both a mess and also makes working around the generator a dirty prospect.
|
 |
Manometer
Whenever an engine has a serious oil leak and, especially when the leak worsens quickly, the most likely cause is excess crank case pressure. This can be caused by excess blow-by due to failed rings or other internal engine problems, but the more common cause is faulty venting systems. It’s easy to check for excessive flow by opening the lower oil fill when the engine is running at full load and checking for air flow. There should be very little.
We chose to use a manometer and measure internal crankcase pressure but the “by feel” is almost as good. In this measurement, we found the crankcase internal pressure is 1.17″ of water. This is 0.042 PSI, so a very slight positive pressure. Northern Lights doesn’t publish crankcase pressure specs for their engines, but the Deere Specification for our main engine is less than 2″ of water. We know from past testing that the Deere runs in the 0.8″ to 1.3″ of water range so the Lugger is right in the middle at 1.17″ of water. This is what we would expect from a healthy engine not showing any adverse signs of wear. |
 |
Temperature
One of the most common causes of failed oil seals is excess temperature, but this engine has never been over-heated. It has a high temperature cut off at 205F and it’s never been above that and, most of the time, it runs down in the 186 to 188F range. Seals generally run at engine temperature so we mostly focus on that. But enclosure air temperatures can be a problem as well, although these problems are usually voltage regulator and electrical components inside the hot enclosure. The hotter it gets the worse for those components. The oil seals are going to run at whatever temperature the engine itself is running at (in our case 186F to 188F and never over 205F).
But we still took the opportunity to check the enclosure air temperature and found 109F in a 88F engine room. Using the worst possible case, we put the generator at full load for an hour and it showed 117F in a 95F engine room. This tells us enclosure temperatures are fine and our voltage regulator is operating in acceptable conditions. If you are checking your own generator, ensure that the enclosure heat shielding is not pulling down or peeling back, blocking air flows, and make sure that you don’t have spares up against the enclosure blocking air flow. Having a rear main oil seal fail before 7,000 hours is a bit early in our opinion, but there is no evidence of environmental problems. There is no question, however, that the rear main oil seal needs to be changed. |
 |
Crankcase Ventilation
The generator crankcase ventilation system used by Northern Lights is a simple design with little to go wrong. The crankcase vents directly to the engine intake through a small diaphragm that forms a valve. It has a light spring on the back that seals the crankcase until something nearing 1.00″ of water develops in which case the diaphragm lifts against the spring and vents the crankcase into the engine air intake. We know from the manometer test earlier that we don’t have excess crankcase pressure, but we still wanted to check that this diaphragm was working correctly and the metal mesh oil mist coalescing filter in front of it was clear. Both are in perfect operating condition and working as designed.
|
 |
Oil Coalescing Filter
Here we are checking the oil coalescing filter to ensure it’s free of obstruction and that crankcase vapors can vent into the engine intake through the diaphragm valve without any resistance beyond the spring behind the diagram valve. All checked out correctly.
|
 |
Experiment
We’ve gone from a generator that leaks no oil for 6,600 hours, to a light oil misting around the generator cooling fan, to oil being thrown freely around the generator enclosure. From light misting to oil running everywhere was only 200 hours and it continues to worsen quickly. We know the engine temperature is fine, the oil level isn’t high, the enclosure temperatures is fine, the crankcase ventilation system is working correctly, but the rear main oil seal is leaking a lot of oil. It appears to have failed both early but also uncharacteristically quickly.
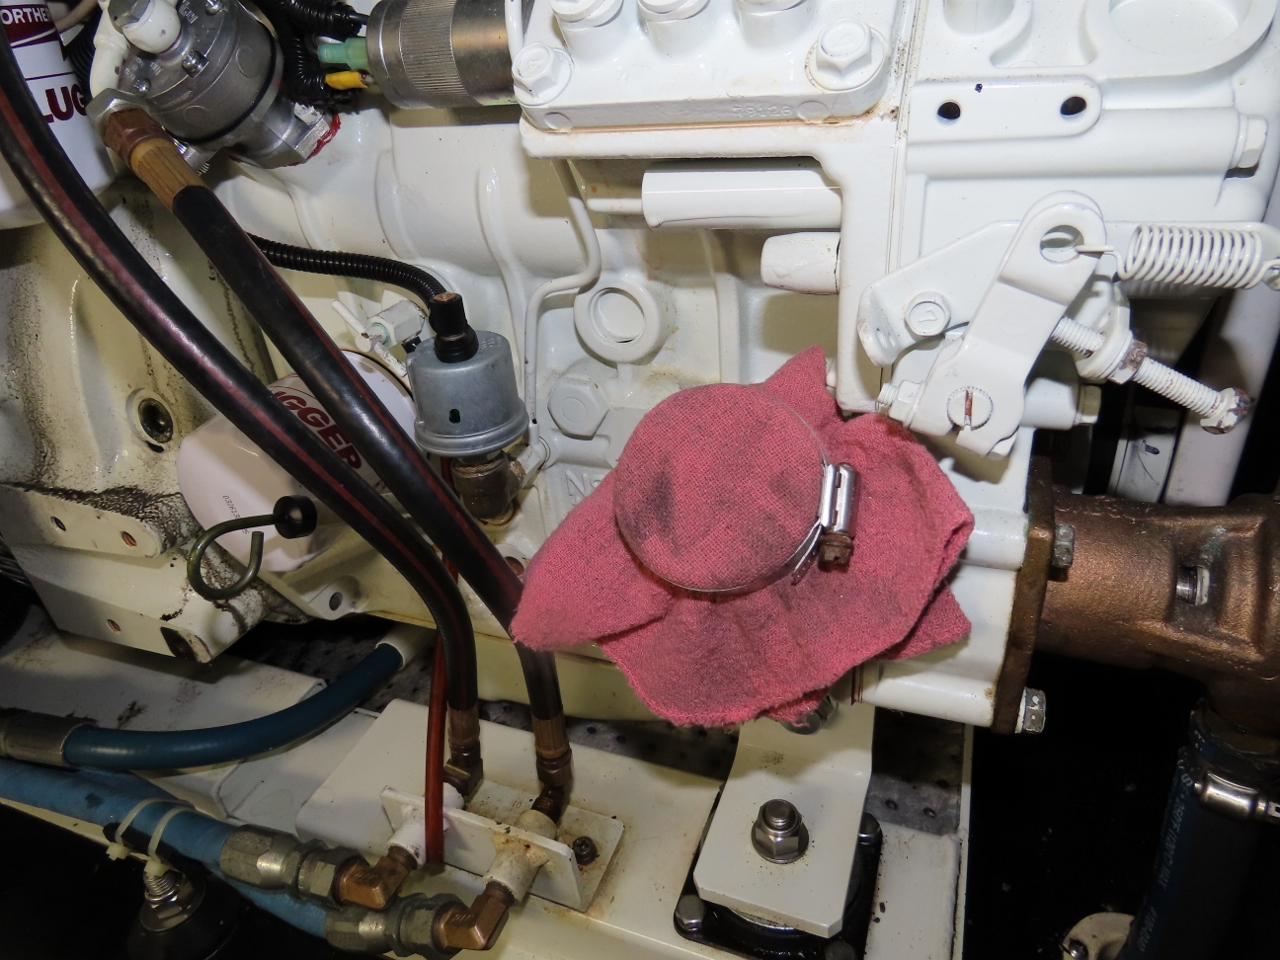
Changing the rear main oil seal is a large job and, for what might be the first time ever, we don’t have the parts we need nor a practical work-around. And because it’s a single-generator boat, we need to keep the engine in use. So we decided to try a couple of experiments. In the first experiment, we decided to run with a neutral crankcase pressure and see if that reduced the oil leakage. In the second planned experiment, we’d run a slight negative pressure. We implemented a zero pressure crankcase by folding a shop rag into fours and hose clamping it over the oil fill hole with the oil fill cap removed. This gives four layers of rag to prevent oil mist problems but, otherwise, to allow a neutral pressure crankcase. |
 |
Improved
The tiny difference between 1.17″ of water and 0″ made a massive difference to the oil leakage rate. Here’s the engine with after 8 hours of operation at normal load. Where oil was thrown around everywhere in the enclosure, it’s now back to a light misting with some light build up of oil on the grill that surrounds the generator cooling fan. This difference is remarkable.
It’s still leaking but it’s only 5 to 10% of what it was leaking before. It used to have oil running down the junction box and the Wavenet as far away as the top corner of the generator enclosure. It was a veritable oil shower in there. It still needs to a new rear main oil seal but we now have more time to get parts and do the job when we have time rather than as emergency service. |
Hello from Kunayala, Panama. My M773LW3 also has a rear main seal leak at 7600 hours.
In my case the oil is slowly spraying at the bottom of the cooling slots so not the mess you have to deal with.
Please send me Ron and Nancy Goldberg’ replacement instructions.
Gracias!
My rear main oil seal leak completely cleaned up. It just stopped leaking. I think there were two factors that lead to solution. The first is the failed #3 cylinder valve seat was leaking unburned diesel past the piston and diluting the oil. This thinning of the oil makes the problem worse. The second is I remove the positive crankcase ventilation diagraph in the valve cover. The way this diaphragm works is when the crankcase pressure exceeds the light spring pressure, it opens and relieves crankcase pressure into the generator intake. This maintains just a very slight positive pressure. In removing the diagraph assembly, I moved from a slight positive crankcase pressure to a slightly negative one and that made a very large difference.
If your generator enclosure temp (or ambient air around the gen) is up over 130F or if the generator has been overheated seriously or the generator is very old, the rear main seal can harden up. If this happens, it’ll leak massively. You might consider checking to see if you are running excess crankcase pressure since that’s an easy fix.
Also you should make sure that you aren’t leaking from somewhere else since most other leaks are easier to fix. If the generator is not throwing oil when running, then the leak is minor or it’s not the rear main. Good luck with your project and I’ll get you the details you requested separately.
James, you mentioned that you have some pictures and instructions for replacing the rear main seal. I will be splitting a M673L3G in order to fit it through a hatch. Are these instructions something you can share until you tackle this job yourself?
Sure, the work was done by Ron and Nancy Goldberg and you’ll find the instructions quite detailed. They gave us permission to share them, so I’ll send the details your way.
Hi James, thanks for the NL gen. oil leak tutorial, very helpful. Our NL gen. has begun to suffer the same leak at 4000 hours. (runs great) Is possible to get Ron and Nancy’s instructions as well? Thanks Joe, Tesoro N5521
Sorry to hear you are seeing a similar leak Joe. I currently have two experiments underway to explore how much I can reduce the oil leak with modifications of crank case pressure. It’s well known that excess crank case pressures cause leakage. With that in mind, we have two experiments underway. The first was to run 1,000 hours with 0 crankcase pressure. For this test, I vented the crankcase through a the oil filler cap to a catch can. This ensures there is no [pressure in the crankcase.
We believe that a big contributor of our rear main oil seal leak was diesel dilution of the engine oil caused by the #3 cylinder not firing due to the failed valve seat but, of course, the injector was still injecting fuel. The first experiment of venting the crankcase to atmospheric was started before the cylinder head was replaced and the oil was changed but, even then, it made a very large positive different and the combination of new oil and zero crankcase ventilation lead to the oil leak only being enough to lightly coat the grill over the generator grill. It’s wonderful not to have it spraying. We’re now 100 hours into the next test where we run slightly negative crankcase pressures. It’s too early to know what difference this makes but it’s certainly not worse.
Hopefully you can avoid or differ having to change your rear main oil seal but, yes, I’ll get you the instruction on how to do the job.
Hello James. please, what did you do to “run slightly negative crankcase pressure” and what was the result?
My rear main seal is also leaking. I drilled a hole in the lower oil cap and ran a hose ending close to the air intake hose . This reduced the leak and eliminated oil vapor from escaping into the atmosphere.
I’m an engineer and when I see phenomena I don’t like, I’m interested in experimenting with different solutions. Venting the crankcase as you have done worked great on ours and it sounds like it’s helping on yours as well. The only downside of this approach is the crankcase is now venting into a “puke” bottle and the emissions are released into the engine room. Not really a problem but I didn’t love the slight odor so did one further experiment.
In the second experiment, I took apart the positive crankcase ventilation in the valve cover. You’ll find four small screws holding a stamped steel cover onto the aluminum valve cover. If you remove this plate you’ll find a rubber diaphragm and a spring. The way it works is as crankcase pressure exceeds the spring pressure, it is vented into the intake manifold where it’s pulled back into the cylinders for combustion. This has the upside of being better for the environment, it’s legally required in many jurisdictions, and it smells better in the engine room. The downside of the approach is the spring requires measurable positive pressure and positive crankcase pressure is a really bad idea that can cause seals to fail early.
In this final test, I removed the crankcase ventilation diaphragm and spring and just sealed the cover to the valve cover with Permatex Orange. This allows the crankcase to have zero to slightly negative pressure since the air filter and intake hose have some slight resistance to flow.
It’s a nice configuration that I ran for 1,000 hours. To really evaluate the approach, it would need more hours but 1,000 hours strongly suggests it an effective solution. It’s not clearly better than what you have done but it’s at least as good and, in my test of 1, seemed slightly better but with the rear seal no longer leaking it’s hard to know for sure which is the best solution. I prefer the crankcase ventilation approach but they are both effective.
Hello James,
I have been watching a bunch of your videos based around the northern lights generator, and saw that you were having problems with your rear main seal. I have a Northern Lights M843NK that was pulled from a boat, the generator has an unknown history. I haven’t attempted to run it yet, beyond attempting to turn it with the starter. I already purchased a replacement starter as the bendix isn’t pushing out, and I watched your starter video again. The amount of oil in the generator head is leading me to believe that it was pulled due to a rear main seal. Even if that wasn’t the reason, the rear main seal will need replacement.
I was wondering if you could forward me the information from
Ron and Nancy Goldberg? It would be nice to get a parts list that they used before I place an order, and instructions and techniques/tools for dissasembly pulling and installing would be priceless as well. Thank you.
It’s on it’s way to you. Good luck on the job.
Hi James, Great detail on a subject few understand as well as you. I went from a drip to a stream in less than a day About to tackle the rear main seal change on my 6KW. Would you still have the instructions from Ron and Nancy?
Thank you,
Chip
Sure. Best of luck on your major service operation.
Hello James,
Any chance I can get the instructions as well for changing the rear main seal on the northern lights generator? I just finished removing an old onan and have a northern lights with a bad main seal.
Thank you,
I just posted the approach I used to avoid changing a rear main oil seal and the procedure to change the seal if you have to go that far (we managed to avoid it): https://mvdirona.com/2022/02/northern-lights-rear-main-oil-seal-leak-part-3/. Good luck with your rear main oil seal leak.
Hi James
I have to do the rear seal on our 12 k generator too.
I purchased the seal. I was told there is a kit as well?
I think to place around the shaft?
Do you know of such a rear seal repair kit?
We haven’t done the job yet but, we did order the seal and the sleeve with the new cylinder head since we’ll eventually need to change that seal. As a temporary work around I remove the lower oil fill cap (near raw water pump) and just covered the hole with a rag to filter any air that enters. Keeping the crankcase at atmospheric pressure substantially reduces the oil leak flow. It was leaking really badly before changing the head and venting the crankcase, I vented the crankcase and it reduce the leakage by about half. Changing the head seemed to substantially reduce the flow as well although that connection is hard to explain with certainty. But, for whatever reason, the leak is down to only a minor annoyance at this point.
The kit is just a press fit sleeve for the crankshaft. I’ve done a few seal changes over the years and never needed to sleeve the cooling surface. I’m not sure why it’s recommended in this case. It might be Northern Lights playing it safe, it could be that some of the engines operate in poor conditions and airborne abrasives get to the crank at the rear main seal, it could be that some engines are abused with very long oil change intervals, or it might even be that the crank isn’t well hardened and tends to wear excessively. I’m not sure.
I was thinking of not using the sleeve unless it is clearly required. Unfortunately, the sleeve was damaged in shipping so I won’t be able to install it unless I order another one. I suspect I won’t and hopefully I won’t find the crank in tough shape.
Could you fixture a Honda EU7000i investor generator in place to get yourself the security of a backup?
You could do that but there are a few minor problems and a big one with that approach. The minor problems are we would need to find a place to store the EU7000i (it’s not that small), it needs to exhaust externally, and be wired into the boat. The storage is the primary concern of that list but all are solvable. In fact, I used to have two EU2000i paralleled together as backup but the space requirement eventually caused us to consider evicting them. What ended up causing the eviction was that these engines require quite a bit of gasoline and when you are supporting the entire boat on a generator, it’ll run around 5 or 6 gallons a day. You end up consuming vast amounts of gasoline in short order and we only have small amounts on board. We have 1750 gallons of diesel but only 50 gallons of gas. It’s hard to close that equation for longer term operation and the space problem ends up being more difficult than you might guess.
What we ended up doing is similar is use the main engine as backup. It can produce 9kw so is quite powerful. It runs on diesel. It has 11,000 hours already so any hours that get added to it in it’s backup generator role, will be almost unoticable. It has auto start as well so, as soon as the primary generator goes down whether we are on the boat or not, the main takes over battery charging roles. The only downsides is it’s louder than the main gen and less fuel efficient (but not 10 to 15% less so).
This is what we did: https://mvdirona.com/2018/01/two-generators-when-you-only-have-one/. It’s a pretty good solution for a small boat. With more space, just having two generators is the best answer.
I use an EU2000 at home for backup power – but mine is modified to use propane. I realize refilling propane might be annoying on a vessel, but there are advantages to not needing to store gasoline.
As you guessed, refilling propane is really challenging on a vessel and some boaters choose to avoid it entirely due to the fire hazard of propane. Each part of the world has their only fittings and regulations and, even in North America, it’s often not possible to get propane tanks filled near docks. Our generator runs on diesel and it’s a great choice for home generators as well but propane burns cleaner and is also widely available in residential areas.
On a boat, storing gasoline is difficult to avoid if you choose to operate a small high speed tender. There are diesel outboards but they are far larger and heavier. Our choice is to carry gasoline on deck even though it’s not as safe as diesel. Even at home (when we had a home :-)), gasoline is hard to avoid in small lawn mowers and weed whackers unless you are willing to put up with long electrical power cords.
How long will your generator run in a 24 hr period? When you do the work will you need to fined a berth with shore power?
The generator runs around 6 hours a day. The way we are set up is, if the primary generator goes offline, then the main engine takes over acting as a 9kw generator. It has autostart installed so it’s can take over automatically if the main gen fails even when we are not on the boat to change operating modes. This is what we did: https://mvdirona.com/2018/01/two-generators-when-you-only-have-one/.
The main engine louder and about 10 to 15% less fuel efficient but otherwise it works fairly well. We could do the work on the generator away from the dock using the main engine as backup but I would prefer to be on the dock and we’ve requested permission from a local marina to be allowed in the marina (all marinas are currently closed for COVID-19) for the duration in the job. It would be much nicer to be able to do this work without the main engine running behind me in a small and hot engine room but, in a pinch, it could be done.
Things continue to operate but we’re still looking forward to getting our little 12kw Northern Lights generator back into it’s primary role.
I cant wait to see the work being done.
That’s a good point Doug. We should consider doing a video of the work. My plan is to do it in two parts: 1) do the cylinder head replacement to solve the valve seat problem we have on number 3 cylinder exhaust and, if that solves the problem and we’re happy with operation after 25 to 50 hours, then we do the rear main oil seal. Two very big jobs where the first completely removes the top of the engine. And the latter force the removing of the generator from the engine and removal of the flywheel to access the rear main oil seal. Both are pretty big jobs. We’ll take pictures if we don’t do a video but we probably will do it as a video.
Yes please, definitely a video if at all possible – have been really enjoying your recent tech/mechanical videos going through these real life issues in detail!
I’m down on the South Coast so sadly at the wrong end of the country to volunteer with taking delivery of parts or anything to help, but hope you manage to get the parts in soon and resolve the issue.
Thanks for the feedback Paul. The Port Authority is willing to take parts delivery for us so we have that covered. The next trick will be getting them here.
Seems like you’ll need to find a berth with shore power to do the job. Are things opening up over there?
We’re still investigating different fault modes that might have led to the problem. Most recently investigating the exhaust system design since salt water intrusion can cause early valve seat recession problems. Our exhaust is necessarily a long run at around 10 to 12′ but it appears to meet the manufacturers specs. The Northern Lights team also asked that we run the generator at load and then check the water levels in the water lift muffler after it’s all run back into it. This appears to be quite good as well with only 2 1/2″ of water in the muffler.
So far everything is checking out well. We’ll probably order the parts today or tomorrow and plan to do the job once we have all the needed parts. Once we open the engine up we may learn some more that influences our plans but, at this point, it looks like it was just an early valve failure. It arguably should have gone longer but one expert pointed out to me that 6,700 hours is equivalent to 268,000 road miles (assuming 40mph average) so early for a diesel but not shockingly so.
We’ll learn more once we open the engine up but don’t want to use since our primary generator is currently acting in a backup role. The main engine has 9kW of generation capability and it’s currently acting as the primary generator with autostart etc. and it’s running multiple times each day but we hate having no backup. The main engine has 11,000 hours and has been very reliable but we really like having a backup so we’ve been holding off taking the head off the generator until we have the parts needed to reassemble it in hand.
The risk we are taking in not taking the generator apart is there may be more bad news waiting for us once we open up. At this point, I’m reasonably confident in our diagnosis so more problems are unlikely but you never know until you look.
Because we are operating using the main engine as our 9kw generator, everything continues to operate as it should with no interruption or hardship. And the 12kW generator is still fully active and ready to go if it’s needed as backup.
I forgot that you’d set up the main that way. Very nice that you have that as a backup.
Yes, in many respects it’s like a wing engine. A wing engine is an emergency backup to the main engine that you hope to never use but just love it if you do need it. It’s slower and less efficient but it’s solves a big problem and you don’t really care about efficiency in the short term. Having backup power is another one that is absolutely vital to protect $1,000 worth of food and as much again in batteries. The main is louder and less efficient but it a great temporary solution and it allows us to continue without problem even on a single generator boat.
You need a backup generator on the wing engine. That would be good to keep the wing engine exercised as well as providing the backup to the backup.
That’s a good suggestion but harder than you might guess to realize. The wing stays exercised running the hydraulic system so it gets started whenever raising or lowering the anchor (hydraulic windlass) or operating in close quarters (hydraulic thrusters). Because it’s well sized for the backup power generation role, our first choice was to make it our backup generator as you suggest. But, 9kw of power is about 15 hp and you can’t drive 15 hp through a single V-belt. It’s hard adding an different pulley on the front of the engine since it drives the hydraulic power take off (PTO) through the front and spacing and alignment are critical there. There isn’t space to add a serpentine belt pulley and it would require a lot of custom engineering to bring it together. That makes driving the alternator load off the front of the engine difficult. On the back of the engine is a ZF-15 transmission for the emergency propulsion systems. There are no other direct PTOs on engine or transmission so there really isn’t anywhere to drive 15hp without a more engineering that I feel like stepping up to.
A final possibility is to drive the alternator using the hydraulic system since it has the needed power and already has a 45cc Rexroth Hydrualic pump which is more than needed to drive 9kw load. In fact, we could go with an even bigger electrical load with this design. Nordhavn did use hydraulic generators for a few years and they worked out poorly overheating and even rarely igniting.
The problem appears to have been poor control system design. There is no reason why a hydraulic generator couldn’t be made to work perfectly well. The failure mode is engaging the generator at low power output levels where there isn’t sufficient cooling of the alternator. This again is easy to avoid and a system could be designed to do this well with control system work. In fact, this was done on Nordhavn 6206 Grey Matter by Gateway Hydraulics (http://www.gh.com.au/) in Brisbane and it works really well. Gateway is impressively good and did a really good job of this control system and the system has run reliably for years so it’s certainly an option.
We gave the wing driven hydraulic alternator careful consideration but ended up concluding it was much more custom work that we wanted to take on and required space somewhere on the boat for a hydraulically driven generator. The option of replacing the second alternator on the main engine with a large 190A@24V only took an hour, it works very well, and it works underway to drive high draw loads without having to start the second generator. We’re pretty happy with the solution.
Good to know as I’m in the market for a Nordhavn myself.
The old ‘take the cap off and stick a rag in it trick’. Gotta love that one eh?
Primitive but effective as a way of working through a seriously leaking rear main oil seal in that generator.